Vantas Dosage
Generic name: HISTRELIN ACETATE 50mg
Dosage form: implant
Drug classes: Gonadotropin releasing hormones, Hormones / antineoplastics
Medically reviewed by Drugs.com. Last updated on Dec 20, 2024.
2.1 Recommended Dose
The recommended dose of VANTAS is one implant for 12 months.
Each implant contains 50 mg histrelin acetate to deliver 41 mg histrelin.
The implant is inserted subcutaneously in the inner aspect of the upper arm and provides continuous release of histrelin (50 mcg/day) for 12 months of hormonal therapy.
VANTAS should be removed after 12 months of therapy (the implant has been designed to allow for a few additional weeks of histrelin release, in order to allow flexibility of medical appointments). At the time an implant is removed, another implant may be inserted to continue therapy.
In patients treated with gonadotropin releasing hormone (GnRH) analogs for prostate cancer, treatment is usually continued upon development of non-metastatic and metastatic castration-resistant prostate cancer.
2.2 Recommended Procedure for Implant Insertion and Removal
This procedure section is intended to provide guidance for the insertion and removal of VANTAS.
Insertion of a new implant can proceed using the following Insertion Procedure. If a previous VANTAS implant must first be removed, please see the Removal Procedure instructions below.
Insertion Procedure
Many of the supplies necessary to insert the implant, including the Insertion Tool and local anesthetic, are provided in a separate Implantation Kit that is shipped along with the implant. Please note that the implant, in its sealed vial, pouch, and carton, must be kept refrigerated (2°C to 8°C) until needed for the procedure. Once removed from refrigeration, the vial containing the implant (still in its unopened pouch and carton) may remain at room temperature for up to 7 days, if necessary, before being used. If not used in that time, the packaged implant may again be properly refrigerated until the expiration date on the carton.
NOTE: The Implantation Kit is to be stored at 20°C to 25°C (68°F to 77°F) only.
Insertion of the VANTAS implant is a surgical procedure. Sterile gloves and aseptic technique must be used to minimize any chance of infection.
1. Setting up the Sterile Field
Using proper aseptic technique, the sterilized components of the Implantation Kit needed for the insertion procedure, including the Insertion Tool, are to be carefully dispensed from their packaging onto the Sterile Field drape (non-fenestrated) provided. NOTE THAT THE KIT BOX AND ALL PACKAGING, INCLUDING THE SURFACE OF THE VIALS, ARE NOT STERILE and should be kept off of the Sterile Field drape.
The implant vial should not be opened until just before the time of insertion. Open the vial by removing the metal band and carefully pour the sterile contents (implant and sterile saline) onto the Sterile Field drape. The implant can then be handled with sterile gloves or with the sterile mosquito clamp provided. AVOID bending or pinching the implant.
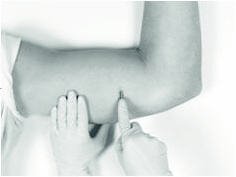
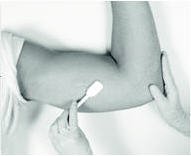
2. Preparing the Patient and the Insertion Site
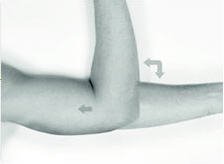
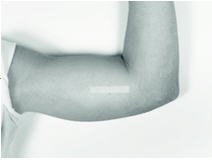
The patient should be on his back, ideally with the arm least used (e.g., left arm for a right-handed person) positioned either bent or extended so that the physician has ready access to the inner aspect of the upper arm. Propping the arm with pillows may help the patient more easily hold the position. The suggested optimum site for subcutaneous insertion is approximately half-way between the shoulder and the elbow, in line with the crease between the biceps and triceps muscles.
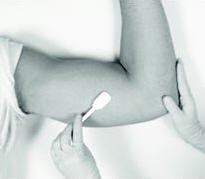
Antiseptic
Swab the insertion area with topical antiseptic, then overlay with the fenestrated Sterile Field drape provided, so that the opening is over the insertion site (for clarity of illustration, the following images do not show the drape).
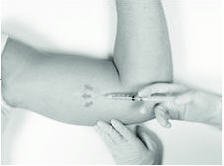
Anesthetic
The method of anesthesia utilized (i.e., local, conscious sedation, general) is at the discretion of the healthcare provider.
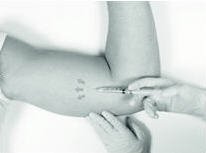
If local anesthesia is selected: a vial of a local anesthetic (e.g., lidocaine HCl 1% with epinephrine or lidocaine HCl 1%)(note that the exterior of the vial is not sterile) has been provided along with a sterile hypodermic needle for injection. After determining the absence of known allergies to the anesthetic agent, inject anesthetic into the subcutaneous tissue, starting at the planned incision site, then infiltrating along the intended subcutaneous insertion path, up to the length of the implant (a little more than one inch).
3. Loading the Insertion Tool
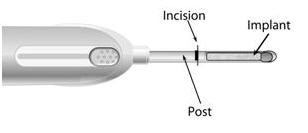
The sterile Insertion Tool is comprised of a fixed handle attached to a retractable, bevel-tipped cannula, into the chamber of which the implant is placed for subcutaneous insertion. Inside the fully extended cannula, up to the level of the black marking, is a fixed piston upon which the implant rests. During the final step of the insertion procedure, the cannula will be retracted into the handle using the slide mechanism (green button), thereby exposing and leaving the implant to remain in the subcutaneous tissue.
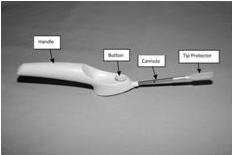
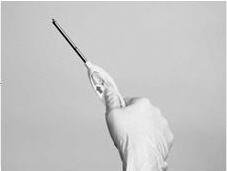
When first grasping the sterile Insertion Tool, confirm that the cannula is fully extended. Verify this by inspecting the position of the green retraction button. The button should be locked in position all the way forward, towards the cannula, farthest from the handle.
The implant can be picked up using sterile gloves or with the sterile mosquito clamp provided. Avoid bending or pinching the implant. Note that the implant may come out of its vial slightly curved and/or partially flattened after refrigerated storage.
To help make the implant more symmetrical prior to loading into the Tool, you can roll the implant a few times (using a sterile glove) between the fingers and thumb.
Insert the implant into the cannula of the Insertion Tool manually or using the mosquito clamp. When inserting the implant into the cannula, DO NOT FORCE the implant. If resistance is felt, the implant should be removed and manually manipulated or rolled as needed, and re-inserted into the cannula.
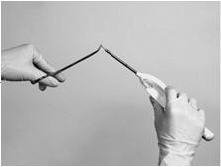
or
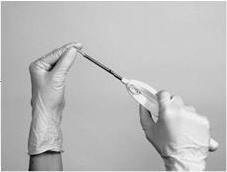
When fully inserted, the implant rests inside the cannula so that just the tip of the implant is visible at the beveled end of the cannula.
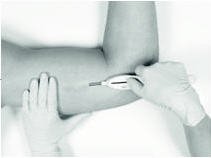
4. Making the Incision
Using the sterile scalpel provided, make an incision transverse to the long axis of the arm, and of a size adequate to allow the bore of the cannula to be inserted into the subcutaneous tissue.
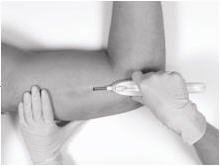
5. Inserting the Implant
The insertion may be easier if a “pocket” for the implant is first created by blunt dissection through the incision, subcutaneously along the path of the anesthetic, using the cannula of the loaded Insertion Tool, or using a sterile hemostatic clamp or equivalent surgical tool.
Be sure to VISIBLY RAISE THE SKIN (known as tenting) at all times during the pocket-making and insertion procedures to ensure correct subcutaneous placement (“just under the skin”) of the implant. Note that the cannula of the Insertion Tool, or whatever tool is being used to create the pocket, SHOULD NOT ENTER MUSCLE TISSUE. Deep insertion of the implant will not affect the performance of VANTAS, but may cause difficulty in the later removal of the implant.
If using the cannula of the loaded Insertion Tool to create the pocket, carefully insert the tip of the cannula into the incision and advance through the subcutaneous tissue, while visibly raising the skin along the length of the cannula up to, but no farther than, the inscribed black line on the cannula. DO NOT DEPRESS THE GREEN RETRACTION BUTTON ON THE TOOL WHILE INSERTING OR ADVANCING THE TOOL INTO THE INCISION.
Pull the Tool back, almost to the beveled tip of the cannula, and advance the Tool forward again, so that the cannula re-enters the pocket completely, but no farther than the inscribed black line. Be sure to keep the insertion path just immediately subcutaneous.
If another tool was used to create the pocket, now insert the loaded cannula of the Insertion Tool containing the implant through the incision, up to the inscribed black line.
Hold the Insertion Tool in place with the base against the patient’s arm as you carefully move your thumb to the green retraction button. Depress the button to release the locking mechanism, then slide the button back toward the handle until it stops, all the while holding the body of the Insertion Tool in place.
Retracting the button causes the cannula to withdraw from the incision, leaving the implant in the subcutaneous tissue. DO NOT FURTHER ADVANCE THE CANNULA ONCE THE RETRACTION PROCESS HAS STARTED. Likewise, do not withdraw the Insertion Tool until the button is fully retracted or the implant may be pulled partially out of the incision. Once the retraction is complete, the Tool can be fully withdrawn.
NOTE: It is helpful during the process of retraction and withdrawal of the cannula to apply pressure to the skin over the implant, to help ensure that the implant remains in the subcutaneous pocket.
If there is a need to re-start the process at any time during the insertion procedure, withdraw the Insertion Tool, carefully extract the implant from the cannula and reset the retraction button on the Tool to its forward-most position. Examine the implant before reloading the implant into the Insertion Tool, and start again.
Placement of the implant should be confirmed by palpation. Note that the tip of a properly-placed implant may not be visible through the incision.
After implantation, briefly cover the site with a sterile gauze pad and apply pressure to ensure hemostasis.
6. Closing the Incision
To close the incision, you can use the absorbable sutures and/or the sterile adhesive surgical strips provided. To improve adhesion of the strips, you can apply benzoin tincture antiseptic (provided) to the skin, and let it dry, before applying the adhesive strips.
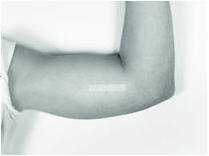
Once closed, cover the incision site with sterile gauze pads and secure the dressing with the bandage provided.
Please provide the patient with a Patient Information Leaflet, which includes information about the implant and instructions on proper care of the insertion site.
Removal Procedure
VANTAS should be removed after 12 months of therapy. Most of the supplies necessary to remove the implant, including the local anesthetic and the sterile mosquito clamp, are provided in the Implantation Kit that is shipped along with a new VANTAS implant. Note that the Implantation Kit is to be stored at 20°C to 25°C (68°F to 77°F) only. See the Insertion Procedure above for further instructions.
Removal of the VANTAS implant is a surgical procedure. Sterile gloves and aseptic technique must be used to minimize any chance of infection.
1. Setting up the Sterile Field
Using proper aseptic technique, the sterilized components of the Implantation Kit needed for the implant removal procedure are to be carefully dispensed from their packaging onto the Sterile Field drape (non-fenestrated) provided. NOTE THAT THE KIT BOX AND ALL PACKAGING, INCLUDING THE SURFACE OF THE VIALS, ARE NOT STERILE and should be kept off of the Sterile Field drape.
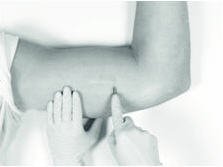
2. Preparing the Patient and the Site
The patient should be on his back, with the arm containing the implant positioned, either bent or extended, so that the physician has ready access to the inner aspect of the upper arm. Propping the arm with pillows may help the patient more easily hold the position.
The implant to be removed should first be located by palpating the inner aspect of the upper arm, near the incision from the prior year.

Generally, the previous implant is readily palpated. In the event the implant is difficult to locate, ultrasound may be used. If ultrasound fails to locate the implant, other imaging techniques such as CT or MRI may be used to locate it (plain films are not recommended as the implant is not radiopaque).
Antiseptic
Swab the area above and around the previous implant with topical antiseptic. Overlay the area with the fenestrated Sterile Field drape provided, so that the hole is over the previous insertion site (for clarity of illustration, the following images do not show the drape).
Anesthetic
The method of anesthesia utilized (i.e., local, conscious sedation, general) is at the discretion of the healthcare provider.
If local anesthesia is selected: a vial of a local anesthetic (e.g., lidocaine HCl 1% with epinephrine or lidocaine HCl 1%) (note that the exterior of the vial is not sterile) has been provided along with a sterile hypodermic needle for injection. After determining the absence of known allergies to the anesthetic agent, inject anesthetic into the subcutaneous tissue at and around the site of the intended incision (the site of the previous implant).
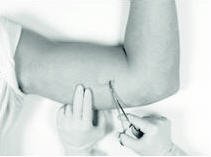
3. Making the Incision and Removing the Implant
Using the sterile scalpel provided, make an incision of a size adequate to allow the implant to be easily removed and, if a new implant will be inserted, large enough for the bore of the cannula of the Insertion Tool provided.
Generally, the tip of the implant will be visible through the incision, possibly covered by a pseudocapsule of tissue. In order to facilitate the removal of the implant, it may be necessary to palpate the head of the implant through the incision using your smallest finger, especially if the head of the implant is not readily visible. In addition, you may need to push down on the distal end of the implant and “massage it forward” toward the incision.
Carefully nick the pseudocapsule to reveal the polymer tip of the implant. It may be beneficial to insert the sterile mosquito clamp provided into the hole created in the pseudocapsule and expand by opening the clamp. Widening the opening of the pseudocapsule may ease the extraction of the implant.
Gently but securely grasp the implant with the sterile mosquito clamp and extract the implant.
Dispose of the implant in a proper manner, treating it like any other biowaste.
Briefly cover the site with a sterile gauze pad and apply pressure to ensure hemostasis.
If inserting a new implant, see the Insertion Procedure instructions provided above. Note that you can insert the new implant into the same “pocket” as the removed implant, or make a new incision at a different site in the same arm or in the contralateral arm.
If a new implant is not to be inserted, proceed to close the incision.
4. Closing the Incision
To close the incision, you can use the absorbable sutures and/or the sterile adhesive surgical strips provided. To improve adhesion of the strips, you can apply benzoin tincture antiseptic (provided) to the skin, and let it dry, before applying the adhesive strips.
Once closed, cover the incision site with sterile gauze pads and secure the dressing with the bandage provided.
Frequently asked questions
More about Vantas (histrelin)
- Check interactions
- Compare alternatives
- Side effects
- During pregnancy
- FDA approval history
- Drug class: gonadotropin releasing hormones
Patient resources
Other brands
Professional resources
Other brands
Related treatment guides
See also:
Further information
Always consult your healthcare provider to ensure the information displayed on this page applies to your personal circumstances.