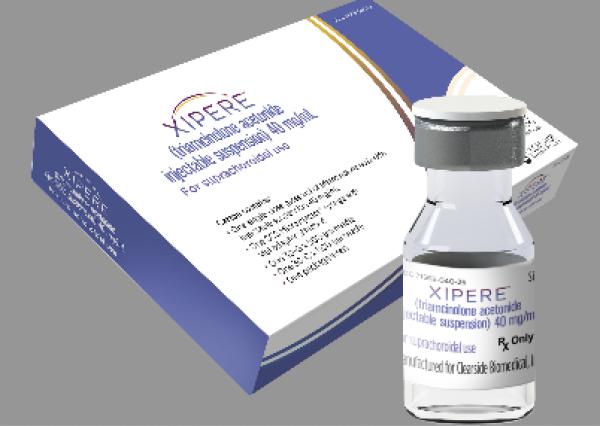
Xipere Injection Dosage
Generic name: TRIAMCINOLONE ACETONIDE 40mg in 1mL
Dosage form: injection, suspension
Drug class: Ophthalmic steroids
Medically reviewed by Drugs.com. Last updated on May 30, 2025.
Dosing Information
For suprachoroidal injection using the SCS Microinjector ®. The recommended dose of XIPERE ®is 4 mg (0.1 mL of the 40 mg/mL injectable suspension).
Preparation for Administration
|
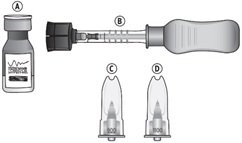
Suprachoroidal injection is performed under aseptic conditions. The components for administration include:
- One single-dose glass vial of triamcinolone acetonide injectable suspension 40 mg/mL
- One SCS Microinjector ®syringe with vial adapter attached
- One 30-G x 900-µm needle
- One 30-G x 1100-µm needle
|
 |
|
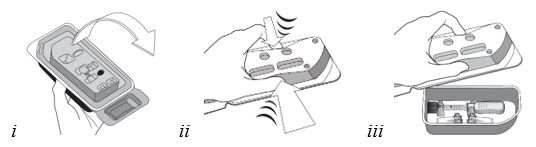
Step 1

Figure A
|
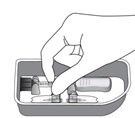
Remove the tray from the carton (see Figure A).
The tray consists of two compartments:
- An open, non-sterile compartment that holds the vial
- A sealed compartment that contains a sterile tray
|
|
Step 2

Figure B
|
Examine the tray for damage (see Figure B). Ensure that the sealed compartment cover is intact and that there is no evidence of damage. If damage is present, do not use.
|
|
Step 3

Figure C
|
Remove the vial from the tray (see Figure C). Examine the vial and ensure there is no evidence of damage. Set aside for use in Step 6.
|
|
Step 4

Figure D
|
Peel off the compartment cover, exposing the sterile tray (see Figure D).
|
|
Step 5
|
 |
|
Figure E
|
|
Grasp and hold the long sides of the tray and invert the tray. Squeeze gently to release the sterile tray onto the appropriate sterile preparation surface (see Figure E, i– iii).
|
|
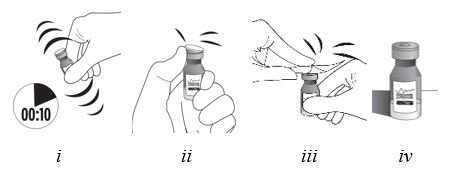
Step 6
 |
|
|
Figure F
Vigorously shake the vial for 10 seconds. Inspect the vial for clumping or granular appearance of the sterile contents. If clumping or granular appearance is present, do not use. Remove the protective plastic cap from the vial and clean the top of the vial with an alcohol wipe. Place the vial on a flat surface (see Figure F, i– iv). To avoid settling of the suspension, continue to the next steps without delay.
|
|
Step 7
 |
Remove the syringe with attached vial adapter from the tray (see Figure G). Ensure the vial adapter is secured to the syringe by tightening the connection.
|
|
Figure G
|
|
Step 8
 |
Holding the clear barrel of the syringe, connect the vial adapter to the vial by firmly pushing the spike of the vial adapter straight through the center of the vial septum until it snaps securely into place (see Figure H).
NOTE: Do not introduce additional air into the syringe prior to connecting the vial adapter to the vial.
|
|
Figure H
|
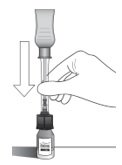
Step 9
Figure I
Invert the entire assembly so that the vial is directly above the syringe. Slide the white plunger handle all the way back and forth multiple times to fill the entire syringe with drug and remove any remaining air (see Figure I, iand ii).
NOTE: The syringe should be handled by the clear barrel during filling, connecting and disconnecting procedures. The white plunger handle has a stop to prevent complete removal of the plunger from the syringe.
|
Step 10
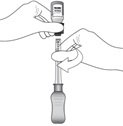
Figure J
|
While holding the vial adapter and vial, disconnect the syringe by twisting it off of the adapter (see Figure J).
Retain the vial, with the vial adapter connected, in the event re-access is necessary.
|
|
Step 11
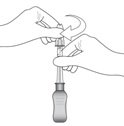
Figure K
|
Connect the 900-µm needle to the syringe by twisting onto the syringe (see Figure K). At the discretion of the physician, the longer needle may be used. Ensure a secure connection.
|
|
Step 12
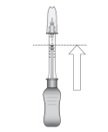
Figure L
|
Hold the syringe barrel with the needle pointing up. Expel air bubbles and excess drug by slowly sliding the white plunger handle so that the plunger tip aligns with the line that marks 0.1 mL on the syringe (see Figure L).
NOTE: Perform the suprachoroidal injection without delay to prevent settling of the drug.
|
Administration
The suprachoroidal injection procedure should be carried out under controlled aseptic conditions, which include the use of sterile gloves, a sterile drape, a sterile eyelid speculum (or equivalent), and a sterile cotton swab. Adequate anesthesia and a broad-spectrum microbicide applied to the periocular skin, eyelid, and ocular surface are recommended to be given prior to the suprachoroidal injection.
|
Step 13
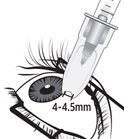
Figure M
|
Identify the injection site by measuring 4 – 4.5 mm posterior to the limbus using the tip of the needle cap or ophthalmic calipers (see Figure M).
|
|
Step 14
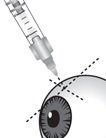
Figure N
|
Carefully pull off the needle cap to expose the needle. Holding the syringe perpendicular to the ocular surface, insert the needle through the conjunctiva into the sclera (see Figure N).
|
|
|
Step 15

Figure O
|
Once the needle is inserted into the sclera, ensure that the hub of the needle is in firm contact with the conjunctiva, compressing the sclera and creating a dimple on the ocular surface using a light amount of force against the eye. Maintain the dimple and perpendicular positioning throughout the injection procedure (see Figure O).
|
|
|
Step 16
Figure P
|
While maintaining the dimple on the ocular surface, gently press the white plunger handle so that the plunger moves forward and drug is slowly injected over 5 – 10 seconds. Movement of the plunger will be felt as a loss of resistance and indicates that the needle is in the correct anatomical location for suprachoroidal injection (see Figure P).
If resistance is felt and the plunger does not advance, confirm the hub is in firm contact with the conjunctiva creating a dimple and that the syringe is positioned perpendicular to the ocular surface. Small adjustments in positioning may be necessary.
|
|
|
|
Step 17
Maintain the hub against the eye for 3 – 5 seconds after the drug product has been injected.
|
|
|
|
|
Step 18
Remove the needle slowly from the eye while holding a sterile cotton swab next to the needle as it is withdrawn. Immediately cover the injection site with a sterile cotton swab.
|
|
|
|
|
Step 19
Hold the swab over the injection site with light pressure for a few seconds and then remove.
|
|
|
|
If continued resistance is experienced during injection attempts:
- Remove the needle from the eye and examine the eye for any issues. If patient safety is not at risk, the physician may use medical judgment to restart the injection procedure at a new site adjacent to the original injection site.
- If resistance continues and patient safety is not at risk, the physician may use appropriate medical judgment to change to the additional included needle in the sterile tray. Twist to remove the needle and reconnect the syringe to the vial by twisting the syringe onto the vial adapter. Repeat the preparation and injection process as stated in Steps 9 – 18 with the additional needle (allowing for any partial dose given with the first needle when completing preparation Step 12).
Immediately following suprachoroidal injection, patients should be monitored for elevation of intraocular pressure. Appropriate monitoring may consist of a check for perfusion of the optic nerve head or tonometry.
Following suprachoroidal injection, patients should be instructed to report any symptoms suggestive of endophthalmitis or retinal detachment (e.g., eye pain, redness of eye, photophobia, blurring of vision) without delay .
Each XIPERE ®package (microinjector syringe with vial adapter, 900-µm needle, 1100-µm needle, and vial of triamcinolone acetonide injectable suspension 40 mg/mL) is single-dose and should only be used for the treatment of one eye.
After suprachoroidal injection, all drug product and components (used or unused) must be discarded appropriately.
Does Xipere interact with my other drugs?
Enter medications to view a detailed interaction report using our Drug Interaction Checker.
More about Xipere (triamcinolone ophthalmic)
Patient resources
Other brands
Triesence, Trivaris
Professional resources
Other brands
Triesence, Trivaris
Related treatment guides
See also:
Further information
Always consult your healthcare provider to ensure the information displayed on this page applies to your personal circumstances.
Medical Disclaimer