Cysview Dosage
Generic name: HEXAMINOLEVULINATE HYDROCHLORIDE 100mg in 50mL;
Dosage form: intravesical solution
Drug class: Malignancy photosensitizers
Medically reviewed by Drugs.com. Last updated on Nov 4, 2024.
Recommended Dose
The recommended dose for adults is 50 mL of reconstituted solution of Cysview [ see Dosage and Administration (2.2)], instilled into the bladder via a urinary catheter [ see Dosage and Administration (2.3)].
Reconstitution of Cysview
Cysview is supplied as a kit containing: a clear glass vial labeled as Cysview (hexaminolevulinate HCl) for Intravesical Solution containing 100 mg hexaminolevulinate hydrochloride as a powder, a prefilled syringe labeled as DILUENT for Cysview containing 50 mL of the diluent, and a catheter adapter. The kit may be supplied as two options; with or without a vial adapter for use during reconstitution.
Perform all steps under aseptic conditions. Wear gloves during the reconstitution procedure; skin exposure to hexaminolevulinate hydrochloride may increase the risk for sensitization to the drug.
 |
 |
||
| Cysview Powder | Cysview Diluent | Plunger Rod | |
Figure 1.
Reconstitution Using a Vial Adapter
- Fasten the plunger rod into the rubber stopper of the prefilled syringe by turning the plunger rod clockwise until it stops (Figure 1).

Figure 2.
- Remove the plastic cap from the vial. Remove the TyveK® cover from the vial adapter blister package. Do not remove the vial adapter from the package. Place the Cysview vial on a flat surface. Using the blister package to hold the vial adapter, connect to the vial with a downward vertical motion. The vial adapter snaps onto the vial as the spike penetrates the rubber stopper of the vial. Remove the plastic blister package and discard it. Take care not to touch the exposed end of the vial adapter (Figure 2).

Figure 3.
- Remove the cap from the prefilled syringe and carefully retain it for subsequent reattachment to the syringe. Hold the prefilled syringe upright and carefully press the plunger rod upward to remove air. Connect the syringe to the vial adapter. Inject about 10 mL of the diluent from the prefilled syringe down into the vial. The vial should be about ¾ full (Figure 3).

Figure 4.
- Without disconnecting the vial adapter from the vial, hold the vial and syringe in a firm grip (Figure 4) and gently shake to dissolve the powder in the diluent. The powder normally dissolves almost immediately.

Figure 5.
- Turn the vial upside down and withdraw all of the dissolved solution from the vial back into the syringe (Figure 5).
Do not inject large amounts of air or diluent when vial is inverted as it may block the venting action of the vial adapter. If this occurs, turn the vial upright and pull back on the plunger rod in the syringe.

Figure 6.
- Disconnect the empty vial with the vial adapter from the syringe tip and discard it. Plug the syringe with the syringe cap (Figure 6). Gently mix the contents of the syringe. The reconstituted solution of Cysview is colorless to pale yellow and clear to slightly opalescent, and free from visible particles.
- Peel off the detachable portion of the syringe label. On the syringe label, add two hours to the present time and write the resulting expiration time and date.
Cysview is now reconstituted and ready for use. The solution of Cysview contains 2 mg/mL of hexaminolevulinate hydrochloride. Instill the reconstituted solution of Cysview into the bladder [ see Bladder instillation of Cysview (2.3)]. If unable to administer the solution shortly after reconstitution, store the solution for up to 2 hours in a refrigerator at 2°-8°C (36°- 46°F) in the labeled syringe. If not used within 2 hours, discard the solution [ see How Supplied/Storage and Handling (16)].
Reconstitution Without the Use of a Vial Adapter
- Fasten the plunger rod into the rubber stopper of the prefilled syringe by turning the plunger rod clockwise until it stops (Figure 1).
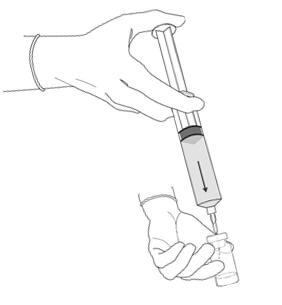
Figure 7.
- Remove the plastic cap from the vial. Remove the cap from the prefilled syringe and carefully retain it for subsequent reattachment to the syringe. Attach a needle to the prefilled syringe. Hold the prefilled syringe upright and carefully press the plunger rod upward to remove air. Penetrate the stopper of the Cysview vial with the needle and inject about 10 mL of the diluent from the prefilled syringe down into the vial. The vial should be about ¾ full (Figure 7).
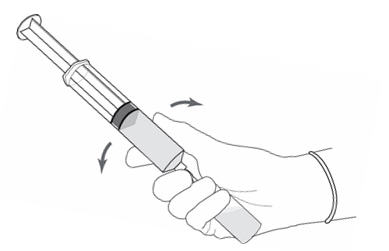
Figure 8.
- Without withdrawing the needle from the vial, hold the vial and syringe in a firm grip (Figure 8) and gently shake to dissolve of the powder in the diluent. The powder normally dissolves almost immediately.


Figure 9.
- Turn the vial upside down and withdraw all of the dissolved solution from the vial back into the syringe (Figure 9).

Figure 10.
- Remove the needle from the vial, disconnect the needle from the syringe tip and discard it. Plug the syringe with the syringe cap (Figure 10). Gently mix the contents of the syringe. The reconstituted solution of Cysview is colorless to pale yellow and clear to slightly opalescent, and free from visible particles.
- Peel off the detachable portion of the syringe label. On the syringe label, add two hours to the present time and write the resulting expiration time and date.
Cysview is now reconstituted and ready for use. The solution of Cysview contains 2 mg/mL of hexaminolevulinate hydrochloride. Instill the reconstituted solution of Cysview into the bladder [ see Bladder instillation of Cysview (2.3)]. If unable to administer the solution shortly after reconstitution, store the solution for up to 2 hours in a refrigerator at 2°-8°C (36°- 46°F) in the labeled syringe. If not used within 2 hours, discard the solution [ see How Supplied/Storage and Handling (16)].
Bladder Instillation of Cysview
For bladder instillation of the solution of Cysview, use straight or intermittent, urethral catheters with a proximal funnel opening that will accommodate the Luer Lock adapter. Use only catheters made of vinyl (uncoated or coated with hydrogel), latex (amber or red), and silicone to instill the reconstituted Cysview. Do not use catheters coated or embedded with silver or antibiotics. In-dwelling bladder catheters (Foley catheters) may be used if the catheters are inserted shortly prior to Cysview administration and are removed following the Cysview instillation.
Use the following steps for bladder instillation of Cysview:
- Using standard sterile catheterization technique, first insert the urethral catheter into the bladder of the patient and use the catheter to completely empty the patient's bladder before instillation of Cysview.

Figure 11.
- To attach the syringe containing the solution of Cysview to the catheter, do the following:
- Remove the syringe cap from the syringe that contains the reconstituted solution of Cysview.
- Attach the Luer Lock end of the (provided) catheter adapter to the syringe.
- Insert the tapered end of the catheter adapter into the funnel opening of the catheter. See Figure 11, with the connection enlarged in the inset.
- Slowly instill the solution of Cysview into the bladder through the catheter (Figure 11), ensuring that the complete volume of the syringe (50 mL) is administered.
- After the solution is instilled, remove the catheter and instruct the patient to retain the solution within the bladder for at least 1 hour; do not exceed 3 hours [ see Cystoscopic examination (2.5)]. Patients may stand, sit and move about during the time period between instillation and start of the cystoscopic procedure.
- Evacuate the solution of Cysview from the bladder as part of routine emptying of the bladder immediately prior to the initiation of the cystoscopic procedure (refer to the Karl Storz D-Light C Photodynamic Diagnostic (PDD) System Manual for further details). Also, the patient may void and completely empty the bladder prior to the procedure.
Avoid skin contact with Cysview. If skin does come in contact with Cysview, wash immediately with soap and water and dry off. After voiding the bladder of Cysview, routinely wash the patient's perineal skin region with soap and water and dry.
Use of the Karl Storz D-Light C Photodynamic Diagnostic (PDD) System
Cysview imaging requires the use of the Karl Storz D-Light C PDD system, which consists of either:
- a light source, a camera head, a camera control unit, a light cable, and a rigid cystoscope for use with the Rigid PDD Cystoscope System, or
- a light source, a camera control unit, and a flexible video cystoscope for use with the Flexible PDD Video Cystoscope System.
The light source enables both white light cystoscopy and blue light (wavelength 360 – 450 nm) fluorescence cystoscopy. Familiarity with this system is essential before beginning the procedure and before instilling Cysview into the bladder. For system set-up and general information for the safe use of the PDD system, refer to the Karl Storz instruction manual for the PDD system and the instruction manuals for each of the system components. The PDD System is not for use by healthcare providers with green-red color blindness.
Cystoscopic Examination
Training
Training and proficiency in cystoscopic procedures are essential prior to the use of Cysview. Carefully review the instruction manuals provided with the Karl Storz D-Light C Photodynamic Diagnosis (PDD) System. For additional training in the use of the PDD System, contact the manufacturer's representative.
Preparation for Cystoscopy
Initiate the cystoscopic examination within 30 minutes after evacuation of Cysview from the bladder, but no less than 1 or more than 3 hours after Cysview is instilled in the bladder. If the patient did not retain Cysview in the bladder for 1 hour, allow 1 hour to pass from the instillation of Cysview into the bladder to the start of the cystoscopic examination . The efficacy of Cysview has not been established when the solution was retained for less than 1 hour.
Cystoscopic Examination
Empty the patient's bladder and then fill the bladder with a clear fluid (standard bladder irrigation fluid) in order to distend the bladder wall for cystoscopic visibility. Ensure adequate irrigation during examination of the bladder; blood, urine or floating particles in the bladder may interfere with visualization under both white light and blue light.
First perform a complete cystoscopic examination of the entire bladder under white light and then repeat the examination of the entire bladder surface under blue light unless the white light cystoscopy reveals extensive mucosal inflammation. Do not perform the blue light cystoscopy if the white light cystoscopy reveals wide-spread mucosal inflammation. Abnormalities of the bladder mucosa during blue light cystoscopy are characterized by the detection of red, homogenous and intense fluorescence. The margins of the abnormal lesions are typically well-demarcated and in contrast to the normal urothelium, which appears blue. Register and document (map) the location (as appropriate for the cystoscopy procedure) and appearance (e.g. papillary, flat) of suspicious lesions and abnormalities seen under either white or blue light.
During the cystoscopic examination, be aware that:
- a red fluorescence is expected at the bladder outlet and the prostatic urethra; this fluorescence occurs in normal tissue and is usually less intense and more diffuse than the bladder mucosal fluorescence associated with malignant lesions.
- tangential light may give false fluorescence . To help avoid false fluorescence, hold the endoscope perpendicular and close to the bladder wall with the bladder distended.
- false positive fluorescence may result from scope trauma from a previous cystoscopic examination and/or bladder inflammation [ see Warnings and Precautions (5.3)].
- malignant lesions may not fluoresce following Cysview administration, particularly if the lesions are coated with necrotic tissue. Blue light may fail to detect tumors which have a tendency to be necrotic on the surface, and necrotic cells generally do not fluoresce [ see Warnings and Precautions (5.3)].
- when performing the blue light cystoscopy, avoid prolonged blue light exposure. Studies have not evaluated the potential for adverse effects from blue light. In the controlled clinical trials, the cumulative blue light exposure from bladder evaluation, mapping and resection did not exceed 32 minutes for any procedure [ see Clinical Studies (14)].
For rigid cystoscopy, perform biopsy and/or resection of suspicious lesions by transurethral resection of the bladder (TURB) only after completing white and blue light cystoscopic examinations with bladder mapping. Using standard cystoscopic practices, obtain biopsies of abnormal areas identified during either white or blue light examination and perform resections. Always check for the completeness of the resections under both white light and blue light before finalizing the TURB procedure.
More about Cysview (hexaminolevulinate)
- Check interactions
- Compare alternatives
- Side effects
- During pregnancy
- FDA approval history
- Drug class: malignancy photosensitizers
- Breastfeeding
Patient resources
Professional resources
Related treatment guides
See also:
Further information
Always consult your healthcare provider to ensure the information displayed on this page applies to your personal circumstances.