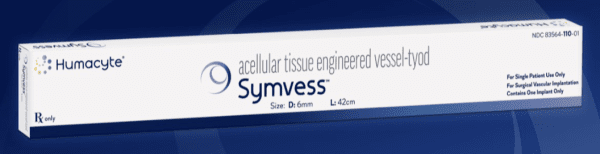
Symvess Dosage
Generic name: ACELLULAR TISSUE ENGINEERED VESSEL 420mm
Dosage form: implant
Medically reviewed by Drugs.com. Last updated on Dec 24, 2024.
Dosage
SYMVESS is administered by surgical implantation to replace the injured extremity artery. The anatomical location in the extremity and length required should be determined by the surgeon implanting the graft based on the appropriate pre-operative clinical evaluation, vessel mapping and/or imaging, and intra-operative considerations. SYMVESS is provided as follows: 6 mm in internal diameter and 42 cm in length. Once removed from packaging, its usable length is approximately 40 cm.
Each package (i.e., box containing Tyvek®-sealed tray) contains one SYMVESS unit for administration to a single patient only.
SYMVESS may be trimmed to provide the length required for the artery replacement. SYMVESS can be trimmed to replace more than one injured extremity artery in the same patient.
Handling of SYMVESS
Supplies:
The following supplies are not included in the carton, but may be needed for the handling of SYMVESS:
1) Sterile basin (as needed) – see Step 8 for details
2) Sheath tunneler (as needed) – see Section 2.3 and Step 3 for details
SYMVESS is to be handled in an appropriate surgical environment as follows:
Step 1: SYMVESS box contains a plastic thermoformed tray with a Tyvek® lid. Open the box and remove the plastic tray (Figure 1).
 Figure 1: SYMVESS box and plastic tray |
Step 2: After removing the tray from the box, check the FreezeAlert temperature indicator (Figure 2) attached to the side of the tray. If a check mark is displayed, SYMVESS has not been exposed to freezing temperatures and can be used. If an “X” is displayed, SYMVESS has been exposed to freezing temperatures and should NOT be used.
 Figure 2: FreezeAlert Temperature indicator |
Step 3: Two operators (one sterile operator and one non-sterile operator) are required to remove the sterile packaging bag containing SYMVESS from the plastic tray. Inspect the plastic tray to check for damage which can lead to loss in sterility of the SYMVESS. Do not open the tray for further use if the product is expired or has visible damage. If packaging is intact and within date of acceptable use, the non-sterile operator pulls back the Tyvek® lid by the corner tab to open the plastic tray containing the sterile packaging bag (Figure 3a and 3b). Take careful steps to avoid touching the sterile contents inside the tray (Figure 3c).
 Figure 3a: Non-sterile operator pulls back the Tyvek® lid by the corner tab |
 Figure 3b: Non-sterile operator opens the plastic tray containing the sterile packaging bag |
Figure 3c displays the components of SYMVESS within the plastic tray.
 Figure 3c: SYMVESS with each component |
Step 4: The non-sterile operator holds the bottom of the plastic tray with one hand and opens the Tyvek® lid with the other. The sterile operator removes the sterile packaging bag from the tray by grasping the ports (i.e., tubing) at the ends of the sterile packaging bag to remove the sterile packaging bag from the tray (Figure 4).
Place the sterile packaging bag on a sterile surface.
 Figure 4: Sterile operator (grey gown and gloves; left) removes the packaging bag from plastic tray by grasping the ports (tubing) while non-sterile operator (white gloves; right) holds the plastic tray and opens the Tyvek® lid |
Step 5: SYMVESS is suspended in sterile saline inside the packaging. The sterile operator cuts one or both of the outer ports on both ends of the packaging using sterile surgical scissors and drains the sterile saline solution contained within the packaging bag (Figure 5a, 5b and 5c).
NOTE: If the middle ports or the small outer port are accidentally cut, there is no need for concern.
 |
 |
 Figure 5a, 5b and 5c: Sterile operator cuts both outer ports one at a time to drain saline solution using surgical scissors |
Step 6: Once the saline solution has been drained, place the packaging bag back on a sterile surface. Using sterile surgical scissors or scalpel blade, cut a small slit on the edge of the packaging bag (Figure 6a), then make a second cut along the length of the packaging bag (Figure 6b). Be careful not to cut SYMVESS. If SYMVESS is accidentally nicked or cut during removal from the packaging bag, discard the damaged SYMVESS, and use a new SYMVESS. Make another cut on the other end of the packaging bag to allow for full exposure of SYMVESS (Figure 6c).
 |
 |
 Figure 6a, 6b and 6c: Sterile operator cuts the packaging bag using surgical scissors to reveal SYMVESS |
Step 7: Holding back the flaps of the open packaging bag, cut SYMVESS 1 cm from the Dacron® cuffs (below the blue sutures) to free it from the packaging bag (Figure 7). Approximately 40 cm in length of SYMVESS should be available for use.
 Figure 7: Sterile operator cuts SYMVESS 1 cm from the Dacron® cuff using surgical scissors |
Step 8: Use sterile gloves or atraumatic instruments when handling SYMVESS. SYMVESS is ready for immediate implantation OR should be kept immersed in a basin of sterile saline solution at room temperature while the patient is being prepared for surgical implantation (Figure 8). SYMVESS may be immersed in sterile saline solution for up to eight hours during surgical preparation for implantation. IF SYMVESS DRIES OUT, IT IS NOT USABLE AND MUST BE DISCARDED.
 Figure 8: Store SYMVESS in a basin of sterile saline solution |
Step 9: SYMVESS contains a clear silicone tube within the lumen. The silicone tube provides structural support to prevent kinking and twisting of SYMVESS when tunneling. The silicone tube can be left in place during any tunneling procedure but should be removed before making an anastomosis. To remove the inner silicone tube, gently grasp the end of SYMVESS and slide SYMVESS down to reveal the inner silicone tube, which can then be pulled out (Figure 9).
Administration
Surgically implant SYMVESS under appropriate aseptic conditions.
Follow the steps below for implantation of SYMVESS:
- When handling SYMVESS, avoid using excessive force, which may lead to SYMVESS damage.
- To avoid damage or contamination, always use sterile gloves and atraumatic instruments when handling SYMVESS. Always protect SYMVESS from damage by heavy or sharp instruments.
- When necessary, a SHEATH TUNNELER may be used to safely deliver SYMVESS through subcutaneous or other tissues. Create a tissue tunnel that closely matches SYMVESS diameter (6 mm tunneller is recommended, but 8 mm tunneller is acceptable). A KELLY-WICK OR NON-SHEATHED TUNNELLER IS NOT RECOMMENDED FOR USE WITH SYMVESS. During the tunneling process, ensure that SYMVESS does not kink or twist within the tunnel. A twisted or kinked vessel will result in compromised flow and performance, thereby increasing the risk of thrombosis and failure.
- It is recommended to keep the inner silicone tube in place within SYMVESS until any tunneling process is complete. Lubricate the lumen of the tunneller sheath with saline solution and then gently push SYMVESS with the silicone tube through the sheath (alternatively SYMVESS can be grasped by or secured to the inner sheath rod and pulled through the sheath). After the tunneling sheath is removed, the inner silicone tube is removed from SYMVESS.
THE INNER SILICONE TUBE MUST BE REMOVED BEFORE CREATING AN ANASTOMOSIS (FIGURE 9)
Figure 9: Remove the inner silicone tube within the lumen of SYMVESS BEFORE creating an anastomosis.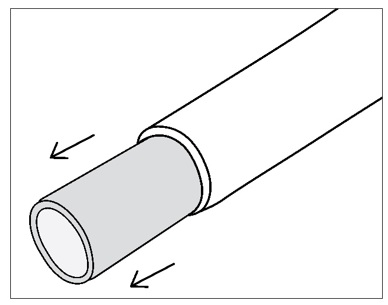
- Following standard surgical procedures, the appropriate length to use for SYMVESS must be carefully determined. SYMVESS DOES NOT ELONGATE UNDER PRESSURE. Since SYMVESS does not elongate, the length must allow SYMVESS to adequately reach both anastomoses. SYMVESS should either be tunneled or held at the site of implantation so that the length to adequately reach both anastomoses is clear. The patient’s body size and posture, and the range of the motions likely to be encountered around the anatomical region of the implantation should be considered when determining length. Choosing the appropriate length of SYMVESS may prevent kinking, twisting, or damaging SYMVESS after implantation.
- Failure to carefully cut SYMVESS may cause damage and result in failure at the anastomosis site or reduced suture retention strength. Cut SYMVESS with sharp vascular scissors as one would trim a human blood vessel prior to implantation. SYMVESS can be held with atraumatic instruments or sterile gloves while cutting with vascular scissors.
- The anastomosis must be precise, and with meticulous attention to detail. SYMVESS may be anastomosed end-to-end or end-to-side with the patient’s vessels. An end-to-side anastomosis may accommodate size discrepancies between the host vessel and SYMVESS. Use of an appropriate anastomotic angle may minimize stresses upon SYMVESS which may reduce kinking and/or mechanical disruptions of SYMVESS, recipient or donor vessel, and/or suture lines.
- Use of non-crushing vascular (atraumatic) clamp is recommended on SYMVESS to avoid mechanical damage or disruption to SYMVESS. AVOID REPEATED, LOCALIZED CLAMPING OR EXCESSIVE CLAMPING ON ANY SECTION OF SYMVESS.
- Use only 5-0 or 6-0 non-absorbable, monofilament suture with size selected based on the nature of the anastomosis. Use of a suture size larger in diameter than 5-0 or smaller in diameter than 6-0 for anastomosis creation with SYMVESS may reduce suture retention.
- A suture bite depth of 2.0-2.5mm is recommended to ensure suture retention.
- Flush static blood from the lumen of SYMVESS while completing the second anastomosis. Failure to do so may result in thrombosis of the vessel.
- Undue anastomotic bleeding may occur if gaps are present between SYMVESS and the host vessel. Use appropriate suture placement and avoid undue tension on the suture line. Topical hemostatic agents may be used to minimize anastomotic bleeding if desired, therefore, the use of these agents will be at the surgeon’s discretion.
- Inspect the operative site carefully prior to closure. Ensure that SYMVESS is covered by healthy muscle and/or soft tissue. Ensure that there are no twists, kinks, redundancy, before and during the tissue closure portion of the case. It may be necessary to clear or release tissue to avoid SYMVESS impingement.
- At the conclusion of the operation, inspect the circulation to ensure that perfusion to the distal vascular bed has not been compromised and assess for risk of compartment syndrome following revascularization.
- Surgical interventions are permissible and up to the surgeon’s discretion. PERCUTANEOUS INTERVENTIONS SHOULD ONLY USE BALLOONS THAT DO NOT EXCEED 6MM IN DIAMETER. Larger diameter balloons used for angioplasty or thrombectomy procedures may result in tearing of the SYMVESS wall or development of pseudoaneurysm. Mechanical thrombectomy devices other than balloons have not been studied with SYMVESS in the trauma setting and therefore are not recommended.

More about Symvess (acellular tissue engineered vessel)
Professional resources
Related treatment guides
See also:
Further information
Always consult your healthcare provider to ensure the information displayed on this page applies to your personal circumstances.