Izervay Dosage
Generic name: AVACINCAPTAD PEGOL SODIUM 20mg in 1mL
Dosage form: injection
Drug class: Anti-angiogenic ophthalmic agents
Medically reviewed by Drugs.com. Last updated on Mar 6, 2025.
Recommended Dosage
The recommended dose for IZERVAY is 2 mg (0.1 mL of 20 mg/mL solution) administered by intravitreal injection to each affected eye once monthly (approximately every 28 ± 7 days).
Preparation for Administration
Important information you should know before you begin:
- •
- Read all the instructions carefully before using IZERVAY.
- •
- The IZERVAY kit includes a glass vial, filter needle, and an empty syringe. The glass vial, filter needle, and empty syringe are for single use only.
- •
- Store IZERVAY in the refrigerator at temperatures between 2ºC to 8ºC (36ºF to 46ºF). Do not freeze. Do not shake.
- •
- Prior to use, allow IZERVAY to reach room temperature, 20⁰C to 25⁰C (68⁰F to 77⁰F). The IZERVAY vial may be kept at room temperature for up to 24 hours. Keep the vial in the original carton to protect from light.
- •
- Use aseptic technique to carry out the preparation of the intravitreal injection.
- •
- Each vial should only be used for the treatment of a single eye.
|
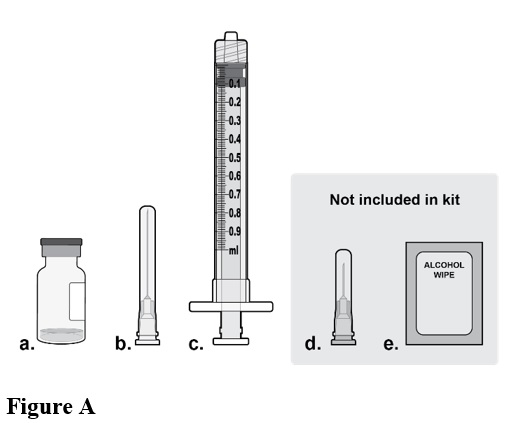
Step 1: Gather Supplies
Gather the following supplies (see Figure A):
|
|
|
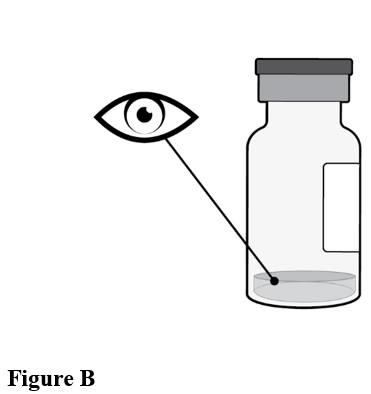
Step 2: Inspect Vial
Inspect the liquid in the vial. It should be a clear to slightly opalescent, colorless to slightly yellow liquid solution (see Figure B).
|
|
|
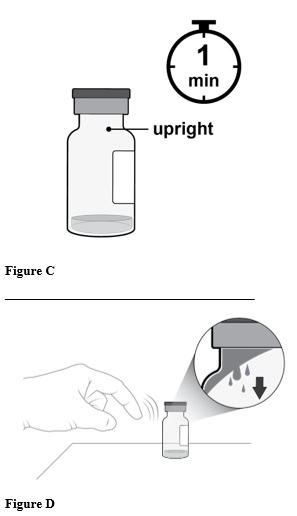
Step 3: Orient Vial
Place the vial upright on a flat surface for about 1 minute after removal from packaging to make sure all liquid settles at the bottom of the vial (see Figure C).
Gently tap the vial with your finger to remove any liquid that may stick to the top of the vial (see Figure D). |
______________________________________ 
|
|
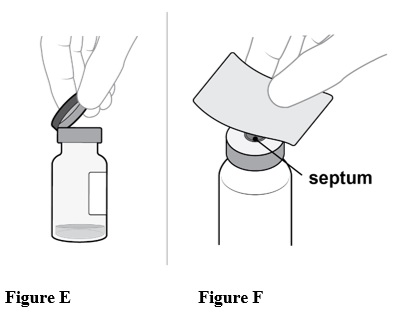
Step 4: Clean Vial
Remove the flip-off cap from the vial (see Figure E).
Gently wipe the vial septum with an alcohol swab (see Figure F). |
|
|
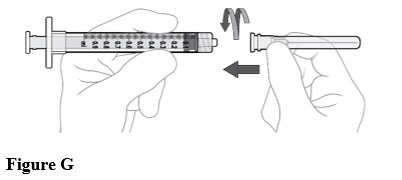
Step 5: Attach Filter Needle
Using aseptic technique, firmly attach the included 18-gauge x 1½ inch filter needle onto the 1 mL Luer lock syringe and twist clockwise to secure (see Figure G). |
|
|
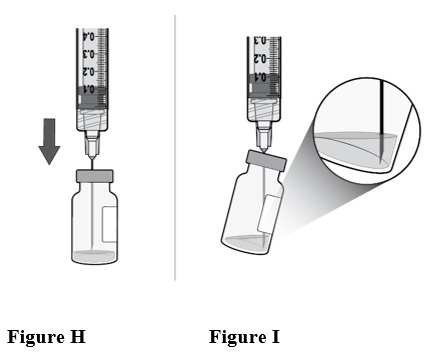
Step 6: Insert Filter Needle into Vial
Using aseptic technique, push the filter needle all the way into the center of the vial septum (see Figure H).
Tilt the vial slightly so that the needle touches the bottom edge of the vial (see Figure I).
Rotate the filter needle so that the bevel is submerged into the liquid to avoid introduction of air. |

|
|
Step 7: Withdraw Liquid
Slowly withdraw all the liquid from the vial (see Figure J).
Draw the plunger rod back far enough to completely empty the filter needle. |
|
|
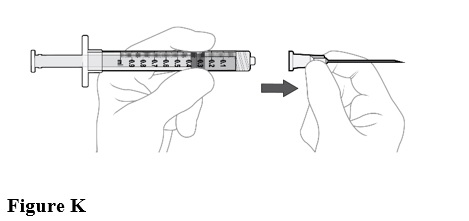
Step 8: Disconnect Filter Needle
Disconnect the filter needle from the syringe and dispose of it in accordance with local regulations (see Figure K).
Do not use the filter needle for the intravitreal injection. |
|
|
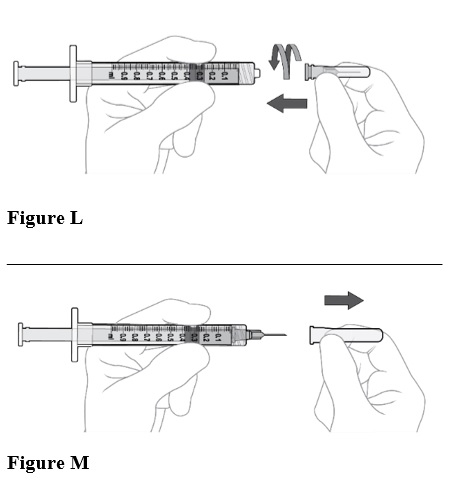
Step 9: Attach Injection Needle
Using aseptic technique, firmly attach the 30-gauge x ½ inch injection needle onto the Luer lock syringe. (see Figure L). Carefully remove the plastic needle shield from the needle by pulling it straight off (see Figure M). |
________________________________________ 
|
|
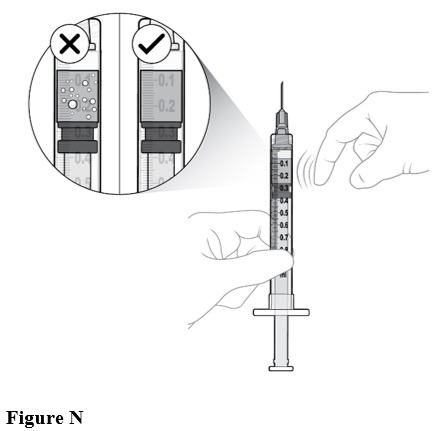
Step 10: Check Syringe
Check for air bubbles by holding the syringe with the needle pointing up. If there are any air bubbles, gently tap the syringe with your finger until the bubbles rise to the top (see Figure N). |
|
|
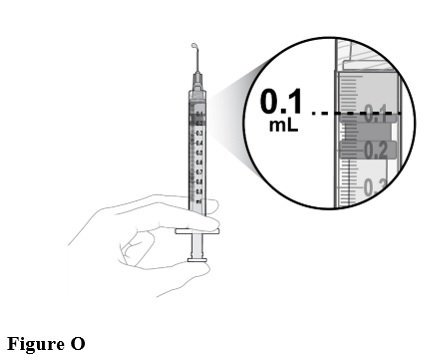
Step 11: Prepare Appropriate Dose
Slowly depress the plunger to:
The syringe is now ready for the injection (see Figure O).
Make sure to give the injection immediately after preparing the dose. |
|
Injection Procedure
Only 0.1 mL (2 mg) should be administered to deliver a single dose. Any excess volume should be disposed.
Prior to the intravitreal injection, patients should be monitored for elevated intraocular pressure (IOP) using tonometry. If necessary, ocular hypotensive medication can be given to lower the IOP.
The intravitreal injection procedure must be carried out under controlled aseptic conditions, which includes the use of surgical hand disinfection, sterile gloves, a sterile drape, and a sterile eyelid speculum (or equivalent). Adequate anesthesia and a broad-spectrum topical microbicide should be given prior to the injection.
Inject slowly until the rubber stopper reaches the end of the syringe to deliver the volume of 0.1 mL. Confirm delivery of the full dose by checking that the rubber stopper has reached the end of the syringe barrel.
Immediately following the intravitreal injection, patients should be monitored for elevation in intraocular pressure (IOP). Appropriate monitoring may consist of a check for perfusion of the optic nerve head or tonometry.
Following intravitreal injection, patients should be instructed to report any symptoms suggestive of endophthalmitis (e.g., eye pain, redness of the eye, photophobia, blurring of vision) without delay.
Each vial and syringe should only be used for the treatment of a single eye. If the contralateral eye requires treatment, a new vial and syringe should be used and the sterile field, syringe, gloves, drapes, eyelid speculum, filter needle, and injection needle should be changed before IZERVAY is administered to the other eye. Repeat the same procedure steps as above.
Any unused medicinal product or waste material should be disposed of in accordance with local regulations.
Frequently asked questions
More about Izervay (avacincaptad pegol ophthalmic)
- Compare alternatives
- Pricing & coupons
- Reviews (4)
- Drug images
- Side effects
- During pregnancy
- FDA approval history
- Drug class: anti-angiogenic ophthalmic agents
- Breastfeeding
- En español
Patient resources
Professional resources
Related treatment guides
See also:
Further information
Always consult your healthcare provider to ensure the information displayed on this page applies to your personal circumstances.