Mirena Dosage
Generic name: LEVONORGESTREL 52mg
Dosage form: intrauterine device
Drug classes: Contraceptives, Progestins
Medically reviewed by Drugs.com. Last updated on Jul 18, 2024.
Dosing Over Time
Mirena contains 52 mg of levonorgestrel (LNG) released in vivo, at a rate of approximately 21 mcg/day after 24 days. This rate decreases progressively to approximately 11 mcg/day after 5 years and 7 mcg/day after 8 years.
For contraception, remove Mirena by the end of the eighth year and replace at the time of removal with a new Mirena if continued use is desired.
For treatment of heavy menstrual bleeding, replace Mirena by the end of the fifth year if continued use is needed because data on use in this indication beyond 5 years are limited.
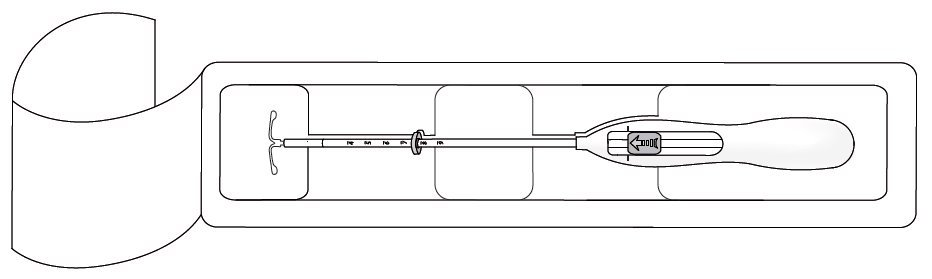
Mirena is supplied in a sterile package within an inserter that enables single-handed loading (see Figure 1). Do not open the package until required for insertion [see Description (11.2)]. Do not use if the seal of the sterile package is broken or appears compromised. Use strict aseptic techniques throughout the insertion procedure [see Warnings and Precautions (5.3)].

Insertion Instructions
- •
- Obtain a complete medical and social history to determine conditions that might influence the selection of a levonorgestrel-releasing intrauterine system (LNG IUS) for contraception. If indicated, perform a physical examination, and appropriate tests for any forms of genital or other sexually transmitted infections. [See Contraindications (4) and Warnings and Precautions (5.10).] Because irregular bleeding/spotting is common during the first months of Mirena use, exclude endometrial pathology (polyps or cancer) prior to the insertion of Mirena in women with persistent or uncharacteristic bleeding [see Warnings and Precautions (5.8)].
- •
- Follow the insertion instructions exactly as described to ensure proper placement and avoid premature release of Mirena from the inserter. Once released, Mirena cannot be re-loaded.
- •
- Check expiration date of Mirena prior to initiating insertion.
- •
- Mirena should be inserted by a trained healthcare provider. Healthcare providers should become thoroughly familiar with the insertion instructions before attempting insertion of Mirena.
- •
- Insertion may be associated with some pain and/or bleeding or vasovagal reactions (for example, syncope, bradycardia), or with seizure, especially in patients with a predisposition to these conditions. Consider administering analgesics prior to insertion.
Timing of Insertion
|
Starting Mirena in women not currently using hormonal or intrauterine contraception |
|
|
Switching to Mirena from an oral, transdermal, or vaginal hormonal contraceptive |
|
|
Switching to Mirena from an injectable progestin contraceptive |
|
|
Switching to Mirena from a contraceptive implant or another IUS |
|
|
Inserting Mirena after first-trimester abortion or miscarriage |
|
|
Inserting Mirena after childbirth or second-trimester abortion or miscarriage |
|
|
|
|
Interval insertion following complete involution of the uterus |
|
Tools for Insertion
Note: The inserter provided with Mirena (see Figure 1) and the Insertion Procedure described in this section are not applicable for immediate insertion after childbirth or second-trimester abortion or miscarriage. For immediate insertion, remove Mirena from the inserter by first loading (see Figure 2) and then releasing (see Figure 7) Mirena from the inserter, and insert according to accepted practice.
Preparation for insertion
- •
- Exclude pregnancy and confirm that there are no other contraindications to the use of Mirena.
- •
- With the patient comfortably in lithotomy position, do a bimanual exam to establish the size, shape and position of the uterus.
- •
- Gently insert a speculum to visualize the cervix.
- •
- Thoroughly cleanse the cervix and vagina with a suitable antiseptic solution.
- •
- Prepare to sound the uterine cavity. Grasp the upper lip of the cervix with a tenaculum forceps and gently apply traction to stabilize and align the cervical canal with the uterine cavity. Perform a paracervical block if needed. If the uterus is retroverted, it may be more appropriate to grasp the lower lip of the cervix. The tenaculum should remain in position and gentle traction on the cervix should be maintained throughout the insertion procedure.
- •
- Gently insert a uterine sound to check the patency of the cervix, measure the depth of the uterine cavity in centimeters, confirm cavity direction, and detect the presence of any uterine anomaly. If you encounter difficulty or cervical stenosis, use dilatation, and not force, to overcome resistance. If cervical dilatation is required, consider using a paracervical block.
- •
- The uterus should sound to a depth of 6 to 10 cm. Insertion of Mirena into a uterine cavity less than 6 cm by sounding may increase the incidence of expulsion, bleeding, pain, perforation, and possibly pregnancy.
Insertion Procedure
Proceed with insertion only after completing the above steps and ascertaining that the patient is appropriate for Mirena. Ensure use of aseptic technique throughout the entire procedure.
Step 1–Opening of the package
- •
- Open the package (Figure 1). The contents of the package are sterile.
- •
- Using sterile gloves lift the handle of the sterile inserter and remove from the sterile package.
Step 2–Load Mirena into the insertion tube
- •
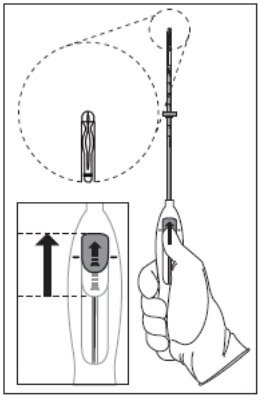
- Push the slider forward as far as possible in the direction of the arrow thereby moving the insertion tube over the Mirena T-body to load Mirena into the insertion tube (Figure 2). The tips of the arms will meet to form a rounded end that extends slightly beyond the insertion tube.
- •
- Maintain forward pressure with your thumb or forefinger on the slider. DO NOT move the slider downward at this time as this may prematurely release the threads of Mirena. Once the slider is moved below the mark, Mirena cannot be re-loaded.
Step 3–Setting the Flange
- •
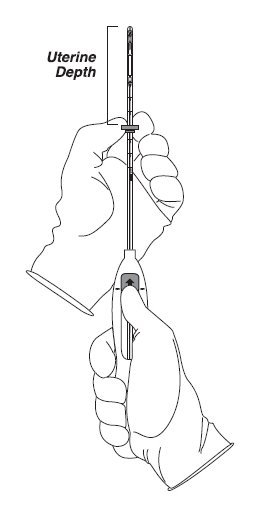
- Holding the slider in this forward position, set the upper edge of the flange to correspond to the uterine depth (in centimeters) measured during sounding (Figure 3).
Step 4–Mirena is now ready to be inserted
- •
- Continue holding the slider in this forward position. Advance the inserter through the cervix until the flange is approximately 1.5–2 cm from the cervix and then pause (Figure 4).
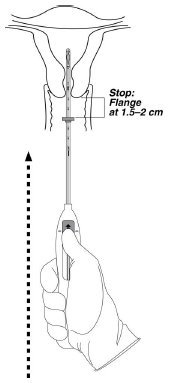
Do not force the inserter. If necessary, dilate the cervical canal.
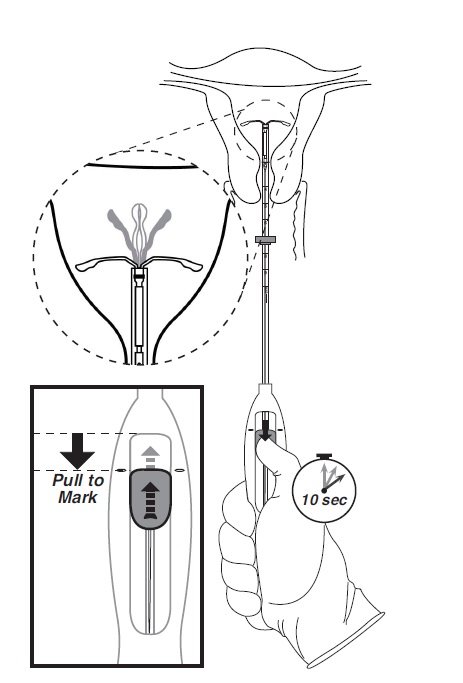
Step 5–Open the arms
While holding the inserter steady, move the slider down to the mark to release the arms of Mirena (Figure 5). Wait 10 seconds for the horizontal arms to open completely.
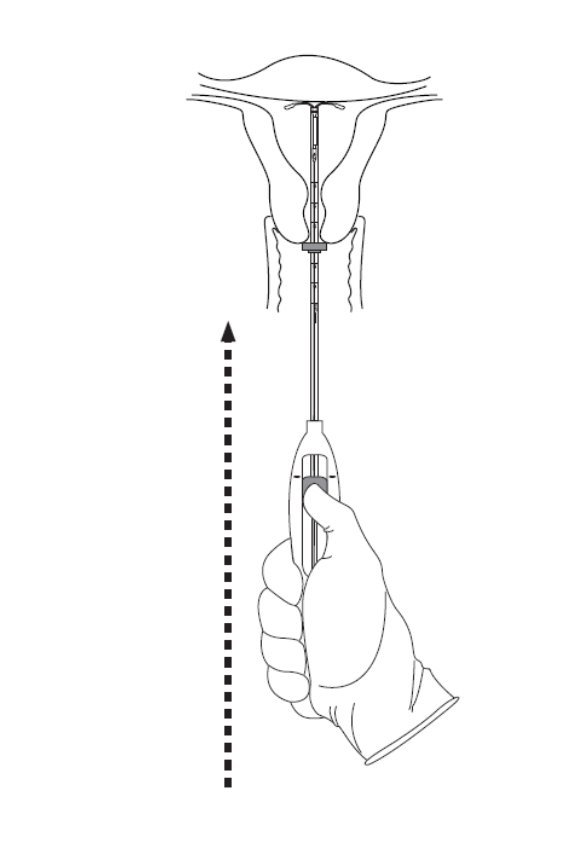
Step 6–Advance to fundal position
- •
- Advance the inserter gently towards the fundus of the uterus until the flange touches the cervix. If you encounter fundal resistance do not continue to advance. Mirena is now in the fundal position (Figure 6). Fundal positioning of Mirena is important to prevent expulsion.
Step 7–Release Mirena and withdraw the inserter
- •
- Holding the entire inserter firmly in place, release Mirena by moving the slider all the way down (Figure 7).
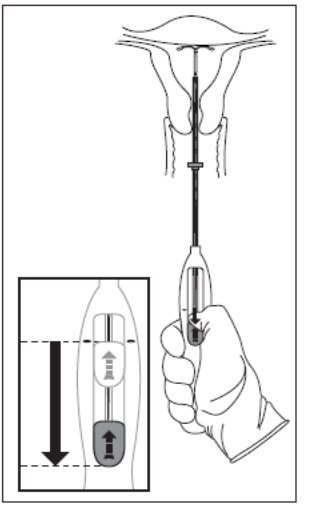
- •
- Continue to hold the slider all the way down while you slowly and gently withdraw the inserter from the uterus.
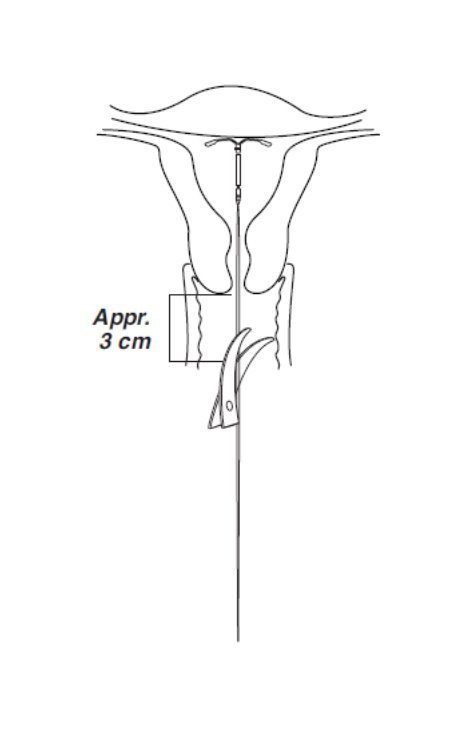
- •
- Using a sharp, curved scissor, cut the threads perpendicular, leaving about 3 cm visible outside of the cervix [cutting threads at an angle may leave sharp ends (Figure 8)]. Do not apply tension or pull on the threads when cutting to prevent displacing Mirena.
Mirena insertion is now complete. Prescribe analgesics, if indicated. Record the Mirena lot number in the patient records.
Important information to consider during or after insertion
- •
- If you suspect that Mirena is not in the correct position, check placement (for example, using transvaginal ultrasound). Remove Mirena if it is not positioned completely within the uterus. Do not reinsert a removed Mirena.
- •
- If there is clinical concern, exceptional pain or bleeding during or after insertion, take appropriate steps (such as physical examination and ultrasound) immediately to exclude perforation.
Patient Follow-up
Reexamine and evaluate patients 4 to 6 weeks after insertion and once a year thereafter, or more frequently if clinically indicated.
Removal of Mirena
Timing of Removal
- •
- For contraception, remove Mirena by the end of the eighth year and replace at the time of removal with a new Mirena if continued use is desired. Replace Mirena by the end of the fifth year if continued treatment of heavy menstrual bleeding is needed.
- •
- If pregnancy is not desired, remove Mirena during the first 7 days of the menstrual cycle, provided the woman is still experiencing regular menses. If removal will occur at other times during the cycle, or the woman does not experience regular menses, she is at risk of pregnancy; start a new contraceptive method a week prior to removal for these women. [See Dosage and Administration (2.5).]
Removal Procedure
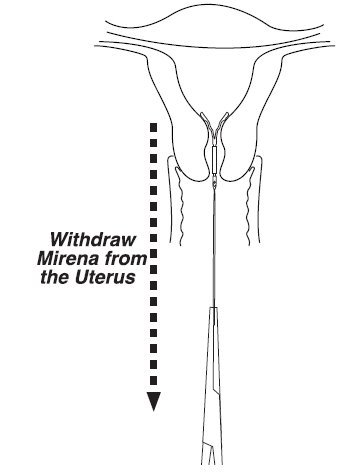
- •
- Remove Mirena by applying gentle traction on the threads with forceps. (Figure 9).
- •
- If the threads are not visible, determine location of Mirena by ultrasound [see Warnings and Precautions (5.10)].
- •
- If Mirena is found to be in the uterine cavity on ultrasound exam, it may be removed using a narrow forceps, such as an alligator forceps. This may require dilation of the cervical canal. After removal of Mirena, examine the system to ensure that it is intact. The hormone cylinder may slide over and cover the horizontal arms, giving the appearance of missing arms. This situation generally does not require further intervention once the system is verified to be intact.
- •
- If unable to remove with gentle traction, determine Mirena location and exclude perforation by ultrasound or other imaging [see Warnings and Precautions (5.10)].
- •
- Removal may be associated with:
- o
- pain and/or bleeding, vasovagal reactions (for example, syncope, bradycardia) or seizure, especially in patients with a predisposition to these conditions.
- o
- breakage or embedment of Mirena in the myometrium that can make removal difficult [see Warnings and Precautions (5.5)]. Analgesia, paracervical anesthesia, cervical dilation, alligator forceps or other grasping instrument, or hysteroscopy may be used to assist in removal.
Continuation of Contraception after Removal
- •
- If pregnancy is not desired and if a woman wishes to continue using Mirena, a new system can be inserted immediately after removal any time during the cycle.
- •
- If a patient with regular cycles wants to start a different contraceptive method, time removal and initiation of the new method to ensure continuous contraception. Either remove Mirena during the first 7 days of the menstrual cycle and start the new method immediately thereafter or start the new method at least 7 days prior to removing Mirena if removal is to occur at other times during the cycle.
- •
- If a patient with irregular cycles or amenorrhea wants to start a different contraceptive method, start the new method at least 7 days before removal.
Frequently asked questions
- What should I expect after a Mirena IUD removal?
- What are the side effects of IUDs?
- Can antibiotics affect IUDs like Kyleena, Mirena, or Skyla?
- Can you get pregnant with an IUD?
- Mirena - has anyone else experienced a brown discharge?
- How long will I be bleeding heavily after Mirena coil fitting?
- Mirena, Kyleena, Skyla & Liletta - What's the difference?
- ParaGard vs Mirena: What's the difference?
- Can Plan B make your period late or cause bleeding?
More about Mirena (levonorgestrel)
- Check interactions
- Compare alternatives
- Pricing & coupons
- Reviews (2,616)
- Latest FDA alerts (1)
- Side effects
- During pregnancy
- Support group
- FDA approval history
- Drug class: contraceptives
- En español
Patient resources
Other brands
Plan B One-Step, Kyleena, Liletta, Skyla, ... +17 more
Professional resources
Other brands
Plan B One-Step, Kyleena, Liletta, Skyla, ... +2 more
Related treatment guides
Further information
Always consult your healthcare provider to ensure the information displayed on this page applies to your personal circumstances.