Consumer Information
Carenotes > Above The Knee Amputation (Inpatient Care)

Above The Knee Amputation

Advertisement

WHAT YOU SHOULD KNOW:

  • Above the knee amputation is surgery to remove your leg above your knee cap. It is also called AKA. You may need an AKA for a health problem that causes poor blood flow, such as diabetes. You may have a severe infection or a blood clot. You may have been in an accident that injured your leg beyond repair. You may also need an AKA if you have cancer, or were born with a deformed leg. Amputations are either planned or done in an emergency. Caregivers will only remove as much of you leg as is absolutely necessary. After an AKA, you may be fitted for a prosthesis (artificial leg) for your residual (remaining) limb.
    Above-the-knee prosthesis


  • You and your caregiver will work together to decide if other treatments should be included in your treatment plan. You may need hyperbaric oxygen treatment to help heal infections. You may need surgery to provide new blood vessels to your leg if you have blood flow problems. If you have cancer, you may need surgery to remove the tumor and graft a donor bone in its place.

CARE AGREEMENT:

You have the right to help plan your care. To help with this plan, you must learn about your health condition and how it may be treated. You can then discuss treatment options with your caregivers. Work with them to decide what care may be used to treat you. You always have the right to refuse treatment.

RISKS:

  • There are always risks with surgery. You may bleed more than usual, get an infection, have trouble breathing, or get blood clots. Sometimes bleeding may cause a collection of blood called a hematoma. This may need to be drained to prevent infection. It may be difficult for your wound to heal. Your caregivers will watch you closely for these problems. Some people continue to feel the part of their leg that has been amputated. These are called phantom feelings. These feelings are normal and may or may not be painful.

  • If you do not have surgery, your problem could get worse. If you have cancer or a badly infected leg and do not get treatment, with time you could die. Call your caregiver if you are worried or have questions about your medicine or care.

WHILE YOU ARE HERE:

Call button: You may use the call button when you need your caregiver. Pain, trouble breathing, or wanting to get out of bed are good reasons to call. The call button should always be close enough for you to reach it.

Gown: A hospital gown is needed so that caregivers can easily check and treat you. Caregivers will show you how to put on your gown. You may not be allowed to wear your own bedclothes or undergarments to the operating room. This is because you may need monitors on your skin during surgery. When you feel better you may be able to wear your own bedclothes.

Informed consent: You have the right to understand your health condition in words that you know. You should be told what tests, treatments, or procedures may be done to treat your condition. Your doctor should also tell you about the risks and benefits of each treatment. You may be asked to sign a consent form that gives caregivers permission to do certain tests, treatments, or procedures. If you are unable to give your consent, someone who has permission can sign this form for you. A consent form is a legal piece of paper that tells exactly what will be done to you. Before giving your consent, make sure all your questions have been answered so that you understand what may happen.

IV: An IV is a tube placed in your vein for giving medicine or liquids. This tube is capped or connected to tubing and liquid.

Pre-op care: You may be given medicine right before your procedure or surgery. This medicine may make you feel relaxed and sleepy. You are taken on a stretcher to the room where your procedure or surgery will be done, and then you are moved to a table or bed.

  • Angiogram: This is a test that may be needed to check the blood flow in your leg. A catheter (thin tube) is threaded into an artery in your groin (the area where your thigh meets your belly). Dye is put into the catheter. X-rays are then taken to watch how the dye and blood flow through your leg. Another test may be done to test the oxygen levels in your leg. These tests help caregivers decide at what point your leg needs to be amputated.

  • Blood tests: You may need blood taken for tests. The blood can be taken from a blood vessel in your hand, arm, or the bend in your elbow. It is tested to see how your body is doing. It can give your caregivers more information about your health condition. You may need to have blood drawn more than once.

  • Blood transfusion: You may need a blood transfusion for certain medical conditions. You may also need a transfusion if you lose a large amount of blood during surgery. You may ask a family member or friend with the same blood type to donate blood for you. This is called directed blood donation. Many people are worried about getting AIDS, hepatitis, or West Nile Virus from a blood transfusion. The risk of this happening is rare. Blood banks test all donated blood for AIDS, hepatitis, and West Nile Virus. If you refuse a blood transfusion, your condition may get worse, and you may die.

  • Chest x-ray: This is a picture of your lungs and heart. Caregivers use it to see how your lungs and heart are doing. Caregivers may use the x-ray to look for signs of infection like pneumonia, or to look for collapsed lungs. Chest x-rays may show tumors, broken ribs, or fluid around the heart and lungs.

  • Heart monitor: This is also called an ECG. Sticky pads are placed on different parts of your body. Each pad has a wire that is hooked to a TV-type screen. This shows caregivers a tracing of the electrical activity of your heart.

  • Pulse oximeter: A pulse oximeter is a machine that tells how much oxygen is in your blood. A cord with a clip or sticky strip is placed on your ear, finger, or toe. The other end of the cord is hooked to a machine. Caregivers use this machine to see if you need more oxygen.

  • Vital signs: This includes taking your temperature, blood pressure, pulse (counting your heartbeat), and respirations (counting your breaths). To take your blood pressure, a cuff is put on your arm and tightened. The cuff is attached to a machine which gives your blood pressure reading. Caregivers may listen to your heart and lungs by using a stethoscope. Your vital signs are taken so caregivers can see how you are doing.

  • General anesthesia: This is medicine that may be given in your IV or as a gas that you breathe. You may wear a face mask or have a tube placed in your mouth and throat. This tube is called an endotracheal tube or ET tube. Usually you are asleep before caregivers put the tube into your throat. The ET tube is usually removed before you wake up. You are completely asleep and free from pain during surgery.

During Surgery:

  • During surgery, caregivers will try to remove the diseased tissue so that your wound will heal well. Caregivers will also try to form your residual (remaining) limb so that a prosthesis will fit well on it. Caregivers will only remove as much of the foot or leg as is absolutely necessary. Caregivers clean your foot and leg with soap and water. This soap may make your skin yellow, but is cleaned off later. Sheets are put over you to keep the surgery area clean.

  • An incision (cut) will be made in your leg above your knee. The part of your leg below that will be removed, and your thigh bone will be made smooth. A flap, made of muscle, tissue, and skin will be made to cover the end of your bone. Tissue for the flap may come from other parts of your leg or foot. If your leg was infected before surgery, caregivers may not put sutures (thread) or staples in to close it right away. The incision may be left open for several days after surgery. If no infection was present, the flap will be closed with stitches. These stitches may be taken out about a month after surgery.

  • A soft or hard bandage is put over your residual limb. If the incision was left open, a soft bandage is used, and covered with an elastic wrap. If the incision was closed with stitches, a cast is put over the bandage. The cast decreases swelling after surgery and protects your residual limb from injury. The cast also makes fitting for a prosthesis easier and quicker. A prosthesis may be put on right after surgery.

After Surgery: You are taken to a room where you will stay until you wake up. Then you will be taken to your room. Do not try to get out of bed until your caregiver says it is OK. A bandage is used to cover your stitches or staples. The bandage keeps the area clean and dry to prevent infection. A caregiver may remove the bandage soon after surgery to check your incision.

Activity guidelines:

  • Change your position often while resting in bed. This moves fluids in your lungs, helping decrease your chance of getting pneumonia. This also helps prevent skin pressure sores, and keeps your muscles and tendons from tightening.

  • While you are in bed, keep your residual limb raised on one to two pillows for the first 24 hours after surgery. This helps decrease swelling.

  • After the first day, keep your residual limb flat on the bed to prevent your hip from tightening.

  • Lie on your stomach twice a day. This also helps prevent hip tightening.

  • Start exercising your good leg and residual limb as soon as caregivers say it is OK. Lift your leg off the bed and move it in big circles. This helps strengthen your leg, and may prevent blood clots from forming. Repeat with your residual limb.
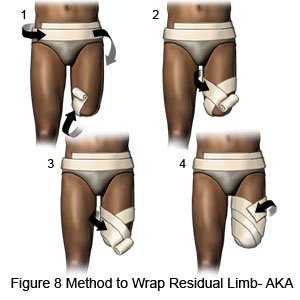
 Stop exercising if you become tired.

Balance and strength exercises:

  • The center of gravity in your body will change because you suddenly weigh less after an amputation. You will have to learn your new center of gravity so that you can keep your balance. Caregivers will help you sit up and transfer to a chair one or two days after surgery. They will teach you how to stand up holding onto the chair for balance and support. If you ever feel weak or dizzy, sit or lie down right away. Then call your caregiver.

  • Caregivers will help you carefully do exercises to strengthen your muscles and improve your balance. Do these exercises while holding onto the chair. Be careful not to hit your residual limb on the chair while doing these exercises.

    • Stand on your toes.

    • Do knee bends.

    • Hop on your foot.

    • Practice standing without holding on to the chair.

Bowel movements: Exercise such as walking can help you have regular bowel movements. Including foods such as fruit, bran, and prune juice, and drinking enough water can also help. Caregivers may give you fiber medicine or a stool softener to help make your BMs softer and more regular.

Deep breathing and coughing: This breathing exercise helps to keep you from getting a lung infection after surgery. Deep breathing opens the tubes going to your lungs. Coughing helps to bring up sputum (mucus) from your lungs for you to spit out. You should deep breathe and cough every hour while you are awake even if you wake up during the night.

  • Hold a pillow tightly against your incision (cut) when you cough to help decrease the pain. Take a deep breath and hold the breath as long as you can. Then push the air out of your lungs with a deep, strong cough. Put any sputum that you have coughed up into a tissue. Take 10 deep breaths in a row every hour while awake. Remember to follow each deep breath with a cough.

  • You may be asked to use an incentive spirometer. This helps you take deeper breaths. Put the plastic piece into your mouth and take a very deep breath. Hold your breath as long as you can. Then let out your breath. Use your incentive spirometer 10 times in a row every hour while awake.

Diet: You may be able to eat when bowel sounds are heard. Your caregiver will listen to your stomach for bowel sounds using a stethoscope. You may be given ice chips at first, and then liquids such as water, broth, juice, or soda pop. If you do not have problems after drinking liquids, caregivers may then give you soft foods. Some examples of soft foods are ice cream, applesauce, or custard. Once you can eat soft food easily, you may begin eating your usual diet.

Drinking liquids: Men 19 years old and older should drink about 3.0 Liters of liquid each day (close to 13 eight-ounce cups). Women 19 years old and older should drink about 2.2 Liters of liquid each day (close to 9 eight-ounce cups). Follow your caregiver's advice if you must change the amount of liquid you drink. For most people, healthy liquids to drink are water, juices, and milk. If you are used to drinking liquids that contain caffeine, such as coffee, these can also be counted in your daily liquid amount. Try to drink enough liquid each day, and not just when you feel thirsty.

Drains: These are thin rubber tubes put into your skin to drain fluid from around your incision. The drains are taken out when the incision stops draining.

Foley catheter: A Foley catheter is a tube that is put into your bladder to drain your urine into a bag. The bladder is an organ where urine is kept. Keep the bag of urine well below your waist. Lifting the urine bag higher will make the urine flow back into your bladder, which can cause an infection. Avoid pulling on the catheter because this may cause pain and bleeding, and the catheter may come out. Do not allow the catheter tubing to kink because this will block the flow of urine.

Intake and output: Your caregivers may need to know the amount of liquid you are getting. They may also need to know how much you are urinating. Men 19 years old and older should drink about 3.0 Liters of liquid each day (close to 13 eight-ounce cups). Women 19 years old and older should drink about 2.2 Liters of liquid each day (close to 9 eight-ounce cups). Certain foods also contain liquid. You may need more or less liquid each day. Ask your caregiver how much liquid you should have each day. Ask caregivers if they need to measure or collect your urine before you dispose of it.

Medicines:

  • Antibiotics: Antibiotics may be given to help treat or prevent an infection caused by germs called bacteria.

  • Antinausea medicine: This medicine may be given to calm your stomach and control vomiting (throwing up). Pain medicine may upset your stomach and make you feel like vomiting. Because of this, pain medicine and anti-nausea medicine are often given at the same time.

  • Pain medicine: Caregivers may give you medicine to take away or decrease your pain. Medicine may be given regularly, or may only be given if you ask caregivers for it. Tell caregivers if your pain does not decrease enough for you to feel better. Do not wait to ask for your pain medicine until the pain is very bad. The medicine may not work as well at controlling your pain if you wait too long to take it. Ask your caregiver for help getting out of bed if you feel tired or dizzy.

  • Patient controlled analgesia: This is also called "PCA". Caregivers may put a machine on your IV pole that puts pain medicine into your IV. You may be taught how to give yourself the pain medicine by pushing a button whenever you feel pain.

  • Stool softeners: You may be given stool softeners to soften your bowel movements, making them easier to pass.

Oxygen: You may need extra oxygen to help you breathe easier. It may be given through a plastic mask over your mouth and nose. It may be given through a nasal cannula, or prongs, instead of a mask. A nasal cannula is a pair of short, thin tubes that rest just inside your nose. Tell your caregiver if your nose gets dry or if the mask or prongs bother you. Ask your caregiver before taking off your oxygen. Never smoke or let anyone else smoke in the same room while your oxygen is on. Doing so may cause a fire.

Physical therapy: A physical therapist helps you with special exercises. These exercises make your bones and muscles stronger and help you learn to do things for yourself again after an amputation. You will be taught how to use crutches or a walker. With time, you may also be taught how to walk with a prosthesis (artificial leg).

Wearing an above-the-knee prosthesis

Pressure stockings: A pressure stocking may be put on your good leg. This tight elastic stocking keeps blood from staying in your leg and causing blood clots. The stockings are also called Ted Hose® or Jobst Stockings®. These stockings can help to keep you from getting blood clots.

Pneumatic boots: A pneumatic boot or legging may be put on your good foot or leg over a pressure stocking or ace wrap. The boot or legging is connected to an air pump machine. The pump tightens and loosens different parts of the boot or legging. This helps push the blood back up to your heart to keep clots from forming. They have many names such as Pneumo Boots®, SCDs, or Plexi Pulse®.

Wrapping your residual limb: Caregivers will teach you or a family member how to wrap your residual limb with an elastic bandage. Doing this helps to control swelling, and helps to form the residual limb into a firm cone shape. This shape will fit into a prosthesis. Caregivers may start wrapping your residual limb within one to three days after surgery, or they may wait until the cast is removed. Wrapping is started low on your residual limb, away from your groin (where your abdomen meets your upper leg). A "figure of 8" method may be used to wrap your residual limb. At first they will not pull the elastic bandage very tight. Caregivers will pull the bandage tighter as your wound heals and the stitches are removed.

Pictures of the "Figure of 8" method for wrapping a residual limb (above knee amputation)
  • Your caregiver will rewrap your residual limb about every 4 hours to keep the bandage smooth and tight.

  • Ask your caregiver to rewrap the bandage if your pain is worse. This may mean the bandage is too tight.

"Figure of 8" method to wrap your residual limb:

  • Hold the bandage roll at your side, and at your waistline. (If your residual limb is on the left, hold the bandage at your left side. If your residual limb is on your right, hold the bandage at your right side.)

  • Starting at the front of your body; begin unrolling the bandage around your waist. When you have completely circled your waist, turn the bandage so that it goes down, past your groin on the inside of your thigh, to the back of your limb.

  • Roll the bandage down your limb, and around the end of your limb. Bring the bandage back up the front of your limb. Partly overlap the bandage as you wrap, so that you are always covering new skin surface.

  • Roll the bandage up your leg, toward your waist. Roll the bandage around the back of your waist, in the same direction as the first time. Repeat the steps until there are no visible skin areas.
  • Helpful hints:

    • While you are unrolling and using an elastic bandage, stretch the bandage slightly while wrapping your limb.

    • If you need to use more than one bandage, secure each bandage with a clip or tape before applying another one. When you are finished, secure the last bandage. When securing the end of a bandage using clips, try to end the bandage in a place that is not in a skin fold.

    • Be sure that all of your skin is covered with the bandages. Bandages should cover your limb from the top of your thigh to the end of your limb.

    • Keep the bandage on at all times except when bathing.

Copyright © 2008 Thomson Healthcare Inc. All rights reserved. Information is for End User's use only and may not be sold, redistributed or otherwise used for commercial purposes.

The above information is an educational aid only. It is not intended as medical advice for individual conditions or treatments. Talk to your doctor, nurse or pharmacist before following any medical regimen to see if it is safe and effective for you.


MedNotes
Advertisement

(web4)