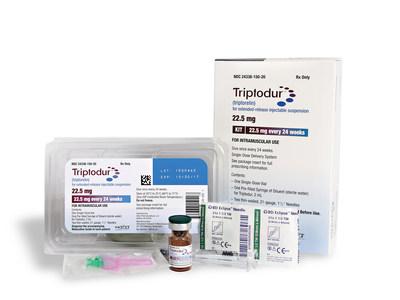
Triptodur Dosage
Generic name: triptorelin 22.5mg in 2mL;
Dosage form: extended-release injection
Drug class: Gonadotropin releasing hormones
Medically reviewed by Drugs.com. Last updated on Dec 15, 2022.
Dosing Information
TRIPTODUR must only be administered by a healthcare provider.
The dosage of TRIPTODUR is 22.5 mg reconstituted with accompanying diluent (Sterile Water) 2 mL, and administered as a single intramuscular injection once every 24 weeks.
TRIPTODUR treatment should be discontinued at the appropriate age of onset of puberty at the discretion of the physician.
Monitoring
Monitor response to TRIPTODUR with LH levels after a GnRH or GnRH agonist stimulation test, basal LH, or serum concentration of sex steroid levels beginning 1 to 2 months following initiation of therapy, during therapy as necessary to confirm maintenance of efficacy, and with each subsequent dose.
Measure height (for calculation of growth rate) every 3-6 months and monitor bone age periodically.
Noncompliance with drug regimen or inadequate dosing may result in inadequate control of the pubertal process with gonadotropins and/or sex steroids increasing above prepubertal levels. If the dose of TRIPTODUR is not adequate switching to an alternative GnRH agonist for the treatment of CPP with the ability for dose adjustment may be necessary.
Reconstitution and Administration Instructions
Read these instructions completely before you begin.
- Triptodur suspension will sediment very quickly and should be injected immediately after reconstitution in accordance with the detailed instructions below.
- If the sequence of steps to prepare the suspension is interrupted and/or the vial is put aside, the suspension will start to separate into diluent and microgranules.
- To minimize the risk of needle blockage during the injection, ensure that the preparation of the injection is not interrupted and/or the mixed suspension syringe is not put aside because the suspension will sediment quickly.
- Use appropriate aseptic technique for preparation and administration.
- Screw the plunger rod into the barrel end of the prefilled sterile water diluent syringe.
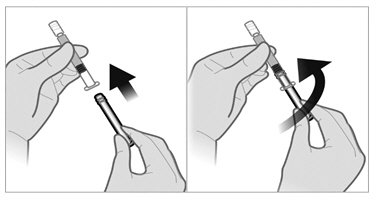
- To remove the cap, twist counterclockwise to separate from the Luer lock on the syringe barrel.
- Firmly attach one of the 21-gauge sterile safety needles onto the prefilled sterile water diluent syringe with a push and clockwise twist. This 21-gauge needle will only be used for reconstitution of the product.
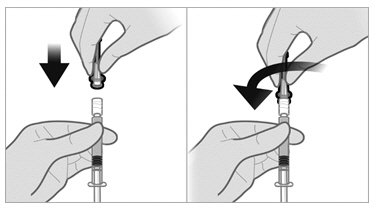
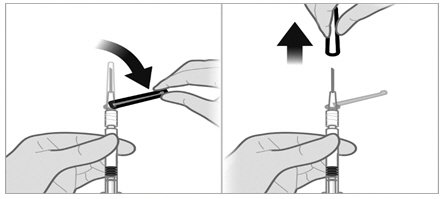
- Remove the plastic Flip-off from the vial. Disinfect the visible part of the stopper
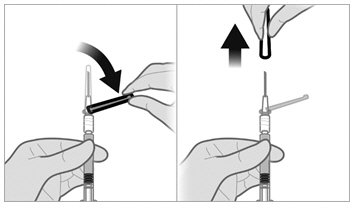
- Pull back on the safety cover towards the syringe and away from the 21-gauge needle. Then pull the clear needle shield off.
- Insert the 21-gauge needle through the stopper. Inject the Sterile Water diluent into the vial, ensuring the diluent rinses the sides of the vial. Do not release the plunger rod.
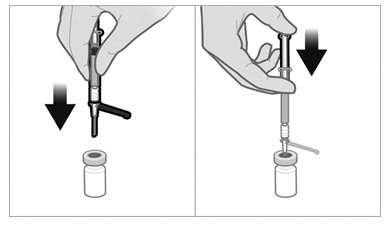
- If the syringe plunger is not maintained in position, it will naturally withdraw product into the syringe. Thoroughly mix the vial with agitation for 30 to 60 seconds, ensuring the diluent rinses the sides of the vial.
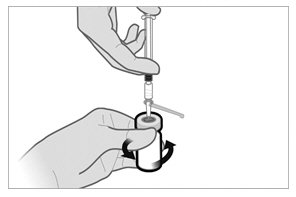
- Before moving on to the next step, check visually that the suspension appears milky and homogeneous without any visible aggregates or precipitates.
- If the suspension DOES NOT appear milky and homogeneous without any visible aggregates or precipitates, continue with the agitation. An up and down agitation can also be used to help eliminate aggregates or precipitates. The complete and homogeneous (milky) suspension of the product may require up to 60 seconds of agitation.
Important: Once mixed, proceed to the next steps and administer without delay.
- The suspension will sediment very quickly so it is imperative to withdraw the suspension into the syringe directly after suspending the product in the vial.
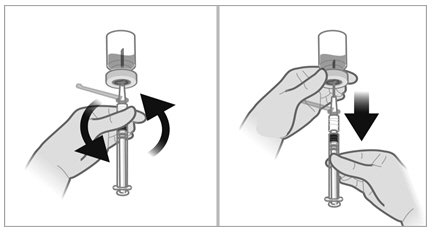
- Invert the vial and move back the syringe in order to position the end of the 21-gauge needle very near the level of the stopper, making sure the needle lumen is still completely in the vial.
- Pull back the plunger rod slowly to withdraw the reconstituted product into the syringe, withdrawing as much of the reconstituted product into the syringe as possible. Move the tip of the needle at the level of the stopper so as to be able to withdraw a maximum amount of suspension.
- Withdraw the needle from the vial and push the safety cover forward toward the needle until you hear and/or feel it lock. Then remove the first 21-gauge needle by grasping the needle hub to disconnect the needle from the syringe and discard it. This (first) 21-gauge needle will no longer be used.
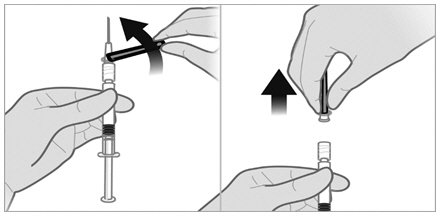
- Firmly attach the second sterile needle onto the syringe with a push and clockwise twist and pull back the safety cover towards the syringe. This 21-gauge needle will be used for administration. Triptodur must only be administered with a thin-wall 21-gauge needle.
- Do not prime the needle. Inspect the suspension visually for particulate matter and discoloration.
- If the suspension does not appear milky and homogeneous, continue with an up and down agitation.
- If the suspension appears milky and homogeneous without visable aggregates or precipitates, administer the suspension immediately.
- Inject the patient intramuscularly, preferably in either buttock or thigh using the entire contents of the syringe.
The injection of the suspension should be performed rapidly and in a steady and uninterrupted manner in order to avoid any potential blockage of the needle.
- After administering the injection, immediately activate the safety cover:
- Center your thumb or forefinger on the textured finger pad area of the safety cover and push it forward over the needle until you hear or feel it lock.
- Use the one-handed technique and activate the mechanism away from yourself and others.
- Immediately discard the syringe assembly into a suitable sharps container.


Frequently asked questions
- What is Triptodur used to treat?
- How long can I take Trelstar (triptorelin) for prostate cancer?
- Why is triptorelin used for prostate cancer?
More about Triptodur (triptorelin)
- Check interactions
- Compare alternatives
- Pricing & coupons
- Drug images
- Side effects
- During pregnancy
- FDA approval history
- Drug class: gonadotropin releasing hormones
- En español
Patient resources
Other brands
Professional resources
Other brands
Related treatment guides
Further information
Always consult your healthcare provider to ensure the information displayed on this page applies to your personal circumstances.