Luxturna Dosage
Generic name: VORETIGENE NEPARVOVEC 0.05mg;
Dosage form: kit
Drug class: Miscellaneous ophthalmic agents
Medically reviewed by Drugs.com. Last updated on Apr 12, 2024.
Dose
- The recommended dose of LUXTURNA for each eye is 1.5 x 10¹¹ vector genomes (vg), administered by subretinal injection in a total volume of 0.3 mL.
- Perform subretinal administration of LUXTURNA to each eye on separate days within a close interval, but no fewer than 6 days apart.
- Recommend systemic oral corticosteroids equivalent to prednisone at 1 mg/kg/day (maximum of 40 mg/day) for a total of 7 days (starting 3 days before administration of LUXTURNA to the first eye), and followed by tapering the dose during the following 10 days. The same corticosteroid dosing regimen applies for the administration of LUXTURNA to the second eye. If the corticosteroid taper following LUXTURNA administration to the first eye is not complete three days prior to the planned LUXTURNA administration to the second eye, then the corticosteroid regimen for the second eye replaces the taper for the first eye.
Preparation
Prepare LUXTURNA within 4 hours of administration using sterile technique under aseptic conditions in a Class II vertical laminar flow biological safety cabinet (BSC). Below is the list of items required for dilution and administration syringe preparation:
- One single-dose vial of LUXTURNA
- Two vials of Diluent
- One 3-mL sterile syringe
- One 20G 1-inch sterile needle
- Three 1-mL sterile syringes
- Three 27G ½-inch sterile needles
- Two sterile syringe caps
- One 10-mL sterile empty glass vial
- One sterile utility drape
- One sterile plastic bag
- Two sterile labels for administration syringes
- One sterile plain label
- One sterile skin marker
Dilution of LUXTURNA
- Thaw one single-dose vial of LUXTURNA and two vials of Diluent at room temperature.
- Mix the contents of the thawed Diluent vials by gently inverting them approximately 5 times.
- Inspect the Diluent vials. If particulates, cloudiness, or discoloration are visible, do not use the vial(s); new vial(s) of Diluent should be used.
- Obtain a 3-mL sterile syringe, a 20G 1-inch sterile needle, and a 10-mL sterile empty glass vial.
- Using the 3-mL syringe with 20G 1-inch needle, transfer 2.7 mL of Diluent to the 10-mL glass vial. Dispose of the needle and syringe in an appropriate container.
- Mix the contents of the thawed LUXTURNA single-dose vial by gently inverting approximately 5 times.
- Inspect the LUXTURNA single-dose vial. If particulates, cloudiness, or discoloration are visible, do not use the vial; a new single-dose vial of LUXTURNA should be used.
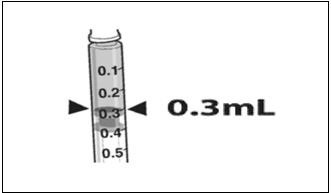
- Draw 0.3 mL of LUXTURNA into a 1-mL sterile syringe with a 27G ½-inch sterile needle. (Figure 1)
Figure 1. Syringe with 0.3 mL LUXTURNA
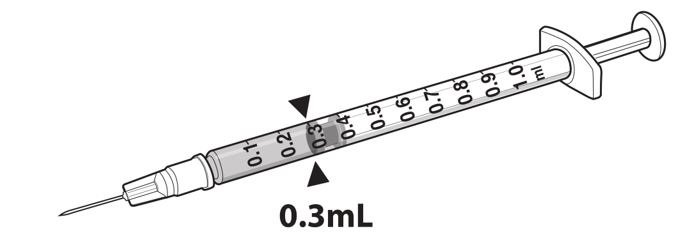
9. Transfer 0.3 mL of LUXTURNA to the glass vial containing 2.7 mL of Diluent from Step 5. Gently invert the 10-mL glass vial approximately 5 times to mix the contents.
10. Using the sterile plain label and sterile skin marker, label the 10-mL glass vial containing the diluted LUXTURNA as follows: "Diluted LUXTURNA".
11. Remove all items from the BSC except the glass vial labeled 'Diluted LUXTURNA' and the sterile skin marker.
12. Re-sanitize the BSC prior to the next steps and place the glass vial and the sterile marker to the left side in the BSC.
Preparation of LUXTURNA for Injection
To keep the syringes sterile, two operators are required for transfer of the contents of the 10-mL glass vial labeled 'Diluted LUXTURNA' into each of two sterile 1-mL syringes.
13. Place a sterile utility drape, a sterile plastic bag, and two sterile labels into the BSC.
14. Place the sterile drape near the Primary Operator on the right side of the sanitized BSC surface, away from the diluted LUXTURNA.
15. The Secondary Operator unwraps two 1-mL syringes, two 27G ½-inch needles, and two syringe caps in the BSC, ensuring that the Primary Operator touches only sterile surfaces while transferring the items onto the sterile drape.
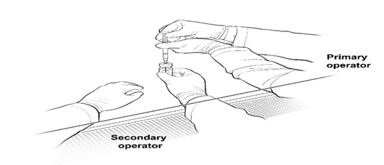
16. The Secondary Operator changes to a new pair of sterile gloves and stands or sits to the left of the Primary Operator. The Secondary Operator holds the 10-mL glass vial containing the diluted LUXTURNA (Figure 2a).
Figure 2a. First Position of the Operators During Preparation of LUXTURNA Syringes
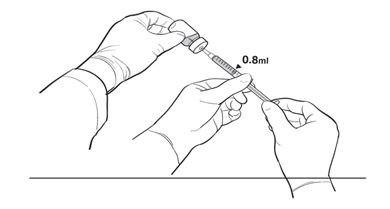
17. The Primary Operator withdraws 0.8 mL of the diluted LUXTURNA into a sterile 1-mL syringe using a 27G ½-inch sterile needle while the secondary operator holds the 10-mL glass vial. After the insertion of the needle, the Secondary Operator inverts the 10-mL glass vial enabling the Primary Operator to withdraw 0.8 mL without touching the 10-mL glass vial (Figure 2b).
Figure 2b. Second Position of the Operators During Preparation of LUXTURNA Syringes
18. The Primary Operator removes the needle and affixes a sterile cap to the sterile syringe, disposes of the needle in an appropriate container, and attaches a sterile label to the administration syringe.
19. The Primary Operator repeats Steps 17 and 18 to prepare a total of two administration syringes. Label the first syringe "Diluted LUXTURNA" and label the second syringe "Back-up Diluted LUXTURNA" using the sterile skin marker. The second syringe will serve as a backup for the surgeon performing the subretinal administration procedure. Discard the back-up syringe after surgery if not used.
20. Inspect both syringes. If particulates, cloudiness, or discoloration are visible, do not use the syringe.
21. Place the syringes into the sterile plastic bag after visual inspection and seal the bag.
22. Place the sterile plastic bag with syringes containing diluted LUXTURNA into an appropriate secondary container (e.g., hard plastic cooler) for delivery to the surgical suite at room temperature.
Administration
LUXTURNA should be administered in the surgical suite under controlled aseptic conditions by a surgeon experienced in performing intraocular surgery. In addition to the syringe containing the diluted LUXTURNA, the following items are required for administration:
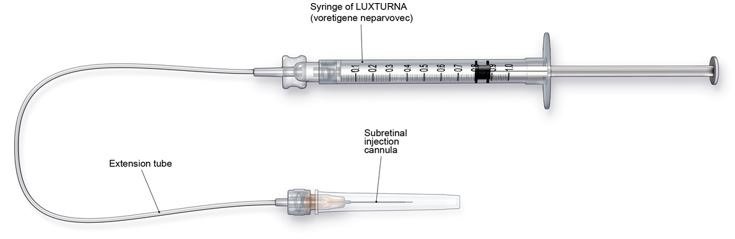
- Subretinal injection cannula with a polyamide micro tip with an inner diameter of 41gauge.
- Extension tube made of polyvinyl chloride no longer than 6" (15.2 cm) in length and with an inner diameter no greater than 1.4mm.
Figure 3. Injection Apparatus Assembly
Follow the steps below for subretinal injection:
- After confirming the availability of LUXTURNA, dilate the eye and give adequate anesthesia to the patient.
- Administer a topical broad spectrum microbiocide to the conjunctiva, cornea and eyelids prior to surgery.
- Inspect LUXTURNA prior to administration. If particulates, cloudiness, or discoloration are visible, do not use the product.
- Connect the syringe containing the diluted LUXTURNA to the extension tube and subretinal injection cannula. To avoid excess priming volume, the extension tube should not exceed 15.2 cm in length and 1.4 mm in inner diameter. Inject the product slowly through the extension tube and the subretinal injection cannula to eliminate any air bubbles.
- Confirm the volume of product available in the syringe for injection, by aligning the plunger tip with the line that marks 0.3 mL. (Figure 4)
Figure 4. Volume of LUXTURNA for Injection
6. After completing a vitrectomy, identify the intended site of administration. The subretinal injection cannula can be introduced via pars plana. (Figure 5a)
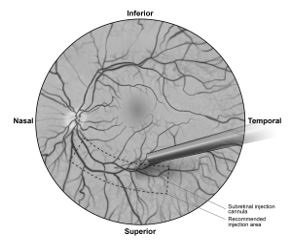
7. Under direct visualization, place the tip of the subretinal injection cannula in contact with the retinal surface. The recommended site of injection is located along the superior vascular arcade, at least 2 mm distal to the center of the fovea (Figure 5b), avoiding direct contact with the retinal vasculature or with areas of pathologic features, such as dense atrophy or intraretinal pigment migration. Inject a small amount of the product slowly until an initial subretinal bleb is observed. Then inject the remaining volume slowly until the total 0.3 mL is delivered.
Figure 5a. Subretinal Injection Cannula Introduced via Pars Plana
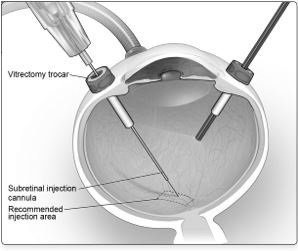
Figure 5b. Tip of the Subretinal Injection Cannula Placed Within the Recommended Site of Injection (Surgeon's Point of View)
8. After completing the injection, remove the subretinal injection cannula from the eye.
9. Following injection, discard all unused product. Dispose of the back-up syringe according to local biosafety guidelines applicable for handling and disposal of the product.
10. Perform a fluid-air exchange, carefully avoiding fluid drainage near the retinotomy created for the subretinal injection.
11. Initiate supine head positioning immediately in the post-operative period.
12. Upon discharge, advise patients to rest in a supine position as much as possible for 24 hours.
Frequently asked questions
More about Luxturna (voretigene neparvovec ophthalmic)
- Compare alternatives
- Side effects
- During pregnancy
- FDA approval history
- Drug class: miscellaneous ophthalmic agents
- En español
Patient resources
Professional resources
Related treatment guides
Further information
Always consult your healthcare provider to ensure the information displayed on this page applies to your personal circumstances.