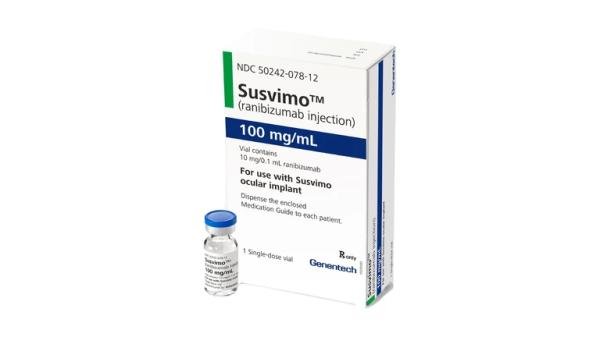
Susvimo Dosage
Generic name: RANIBIZUMAB 100mg in 1mL
Dosage form: injection, solution
Drug class: Anti-angiogenic ophthalmic agents
Medically reviewed by Drugs.com. Last updated on Nov 17, 2022.
General Information
For Intravitreal Use via SUSVIMO ocular implant.
The SUSVIMO initial fill and ocular implant insertion and implant removal procedures must be performed under aseptic conditions by a physician experienced in vitreoretinal surgery. The SUSVIMO ocular implant must be surgically implanted in the eye or removed from the eye (if medically necessary) in an operating room using aseptic technique. See SUSVIMO Instructions for Use and the standardized steps to optimize surgical outcomes.
SUSVIMO refill-exchange procedures must be performed under aseptic conditions by a physician experienced in ophthalmic surgery [see Dosage and Administration (2.7)].
Do not administer SUSVIMO (ranibizumab injection) as a bolus intravitreal injection. Do not substitute SUSVIMO (ranibizumab injection) with other ranibizumab products.
Neovascular (Wet) Age-Related Macular Degeneration (AMD)
The recommended dose of SUSVIMO (ranibizumab injection) is 2 mg (0.02 mL of 100 mg/mL solution) continuously delivered via the SUSVIMO ocular implant with refills administered every 24 weeks (approximately 6 months).
Supplemental Treatment with Intravitreal Ranibizumab Injection
Supplemental treatment with 0.5 mg (0.05 mL of 10 mg/mL) intravitreal ranibizumab injection may be administered in the affected eye while the SUSVIMO implant is in place and if clinically necessary [see Clinical Studies (14)].
Ocular Implant Initial Fill
The implant initial fill procedure must be performed by a physician experienced in vitreoretinal surgery [see Dosage and Administration (2.1)]. The implant will be filled using aseptic technique with 0.02 mL of SUSVIMO (ranibizumab injection) prior to insertion of the implant into the patient's eye [see Dosage and Administration (2.5)]. Refer to the complete SUSVIMO Instructions for Use for the initial fill and implant procedure included in the insertion tool assembly carton for further details.
Use aseptic technique to carry out the following preparation steps prior to insertion of the ocular implant into the patient's eye:
Step 1: Gather the supplies needed.
|
||
| Step 2: Transfer Dose from Vial to Syringe | ||
| Note: | Use the filter needle (not included) to withdraw SUSVIMO (ranibizumab injection) from the vial. | 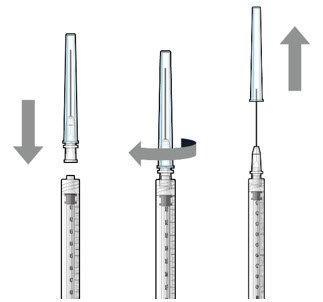 Figure 1 |
Do not use the SUSVIMO initial fill needle for this step.
|
||
Step 3: Remove Air from Syringe
|
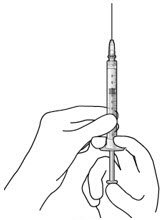 Figure2 |
|
| Step 4: Attach SUSVIMO Initial Fill Needle Do not use the filter needle to fill the implant.
|
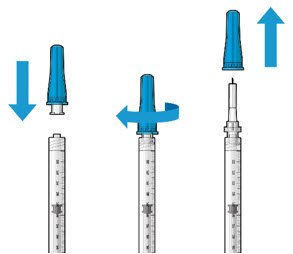 Figure 3 |
|
Step 5: Remove Any Remaining Air from Syringe
|
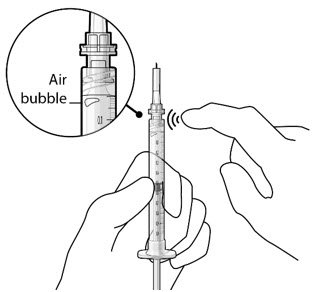 Figure 4 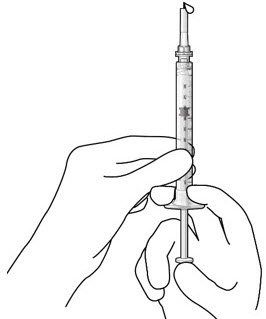 Figure 5 |
|
| Note: | It is important to preserve as much drug as possible in order to completely fill the implant. | |
Step 6: Inspect the Syringe for Air Bubbles
|
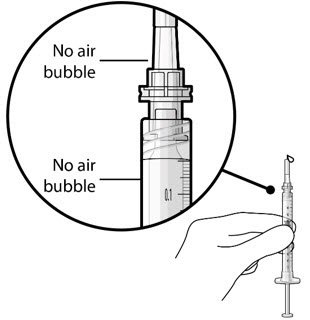 Figure 6 |
|
| Note: | Use the syringe within 15 minutes of removing all air to avoid ranibizumab drying in the needle and impeding fluid flow. Do not use the initial fill needle if the needle is clogged. |
|
| Step 7: Load Syringe into the Carrier Do not hold or push on the plunger rod of the syringe while inserting the needle into the implant septum.
|
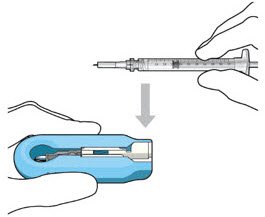 Figure 7: Align and lower the syringe into the carrier 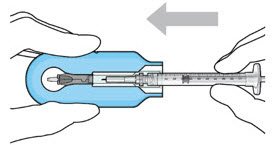 Figure 8: Push the syringe into the carrier 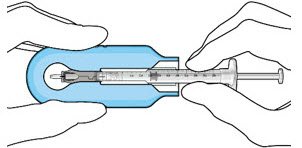 Figure 9: Syringe with initial fill needle inserted through the implant septum |
|
Step 8: Fill Ocular Implant with SUSVIMO (ranibizumab injection) Under Microscope
|
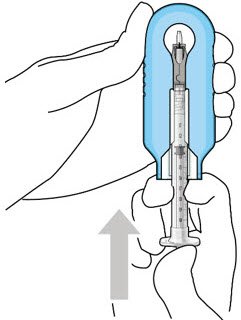 Figure 10: Administer ranibizumab into the implant 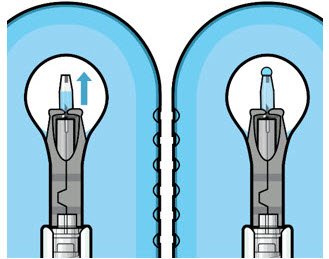 Figure 11: Dome of drug solution forms at tip of implant as viewed under magnification |
|
| Note: | When filling the ocular implant, drug solution should only exit the ocular implant from the release control element. If drug solution is leaking from the implant at a different location, such as the side of the implant, do not use the ocular implant. If fluid is leaking from the septum at the needle insertion site, the needle may not be fully penetrating the implant septum. Fully push the syringe forward before continuing to fill the ocular implant. |
|
|
||
Step 9: Inspect the Filled Ocular Implant Under the Microscope
|
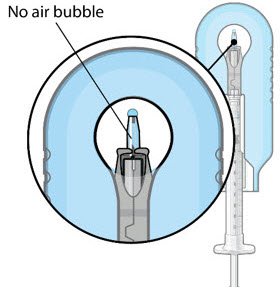 Figure 12: Proper appearance of implant after initial filling with ranibizumab |
|
| Note: | Minimize air bubbles within the implant reservoir as they may cause slower drug release. If an air bubble is present, it must be no larger than 1/3 of the widest diameter of the implant. If excess air is observed, do not use the ocular implant. | |
| Note: | No more than 30 minutes should pass between the initial fill of the implant and the insertion into the patient's eye to ensure that the release control element remains saturated with SUSVIMO (ranibizumab injection). If SUSVIMO (ranibizumab injection) dries in the release control element, the implant may not release the drug properly into the vitreous after insertion. | |
Step 10: Remove the Syringe and Guide Sleeve from the Carrier
|
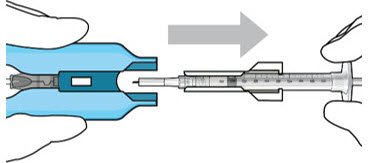 Figure 13: Remove the syringe and guide sleeve from the insertion tool carrier |
|
| Step 11: Slide the Insertion Tool Handle into the Carrier | 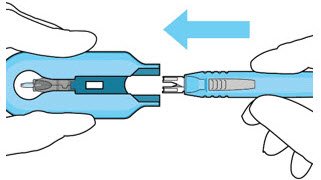 Figure 14: Insert the handle into the insertion tool carrier 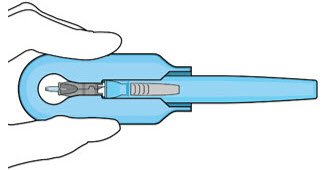 Figure 15: Fully inserted handle |
|
| Note: | Do not withdraw the handle and implant until the eye is ready for insertion. Contact between the implant and any surface or object – even within the sterile field – may result in the introduction of a foreign body into the vitreous. | |
Ocular Implant Insertion
SUSVIMO ocular implant insertion is a surgical procedure that is performed in an operating room. The procedure must be performed under aseptic conditions by a physician experienced in vitreoretinal surgery [see Dosage and Administration (2.1)].
The ocular implant is filled with SUSVIMO (ranibizumab injection) immediately prior to insertion. No more than 30 minutes should pass between the initial fill of the ocular implant and the insertion into the patient's eye.
After placing an infusion line in the eye, create at least a 6×6 mm peritomy of the conjunctiva and Tenon's capsule centered around the selected SUSVIMO implant location in the supero-temporal quadrant. Perform careful conjunctival incision, hemostasis of the underlying sclera, and generous undermining of Tenon's capsule. Using aseptic technique, fill the ocular implant [see Dosage and Administration (2.4)]. Using an MVR blade, create a full thickness dissection of the sclera 4 mm from the limbus until the pars plana is fully visible, with final target scleral incision length of 3.5 mm. Using a 532 nm laser endoprobe, apply contiguous, overlapping laser spots starting at 300 mW 1000 ms along the full length of the exposed pars plana and repeat until complete ablation is achieved. Pass a 3.2 mm slit knife perpendicularly through the center of the scleral dissection to open the underlying pars plana. Use the insertion tool to slowly insert the SUSVIMO implant into the sclero-pars plana incision perpendicular to the globe, ensuring that the long axis of the implant flange is properly aligned with the sclero-pars plana incision. Using the closed gripper tips of the insertion tool, seat the implant flush against the sclera. Clean any residual vitreous around the implant flange using a vitrector. Suture both Tenon's capsule and conjunctiva, using scleral anchoring at the apex of the peritomy, ensuring complete coverage of the implant flange. Refer to the complete SUSVIMO Instructions for Use for the initial fill and implant procedure included in the insertion tool assembly carton for further details.
Ocular Implant Removal
Removal of the SUSVIMO ocular implant is a surgical procedure that is performed in an operating room. The procedure must be performed under aseptic conditions by a physician experienced in vitreoretinal surgery [see Dosage and Administration (2.1)].
After placing an infusion line in the eye, create at least a 6×6 mm peritomy of the conjunctiva and Tenon's capsule around the SUSVIMO ocular implant flange. Remove any fibrous capsule or scar tissue that may have formed over the implant flange and septum using scalpel and forceps. With the explant tool oriented perpendicular to the globe, align the contoured tips with the long axis of the implant flange and grasp underneath the implant flange. Once the implant is secured in the explant tool, pull the implant from the eye in a perpendicular motion. Clear any vitreous prolapse present within or around the scleral wound using a vitrector. Completely close the scleral incision with multiple non-absorbable sutures. Close the Tenon's capsule and conjunctiva to completely cover the scleral incision. Refer to the complete Instructions for Use for the implant removal procedure included in the explant tool carton for further details.
Ocular Implant Refill-Exchange Procedure
The SUSVIMO ocular implant refill-exchange procedure must be performed under strict aseptic conditions by a physician experienced in ophthalmic surgery [see Dosage and Administration (2.1)]. This includes the use of a surgical mask, sterile gloves, and a lid speculum.
Prior to and after the refill-exchange procedure, perform a dilated slit lamp exam and/or dilated indirect ophthalmoscopy to inspect the implant in the vitreous cavity through the pupil to identify if dislodgement of the implant septum has occurred [see Figure 31 and Warnings and Precautions (5.4)]. If the septum has dislodged, any further refill-exchange procedures should not be performed because normal device functioning cannot be assured. Discontinue treatment with SUSVIMO (ranibizumab injection) following septum dislodgement and consider implant removal should the benefit of the removal procedure outweigh the risk.
Step 1: Gather the supplies needed.
|
||
Step 2: Inspect Packaging and Components
|
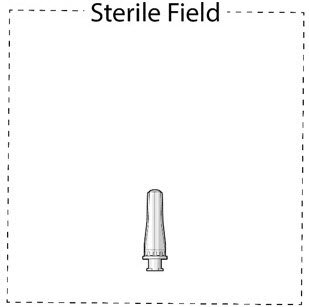 Figure 16 Figure 16 |
|
Step 3: Inspect SUSVIMO (ranibizumab injection)
|
||
Step 4: Patient Preparation
|
||
| Step 5: Transfer Dose from Vial to Syringe | 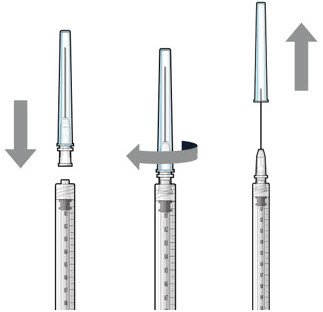 Figure 17 |
|
| Note: | Use the filter needle to withdraw SUSVIMO (ranibizumab injection) from the vial. | |
Do not use the SUSVIMO refill needle for this step.
|
||
Step 6: Remove Air from Syringe
|
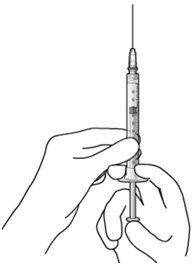 Figure 18 |
|
| Step 7: Attach SUSVIMO Refill Needle Do not use the filter needle to fill the implant.
|
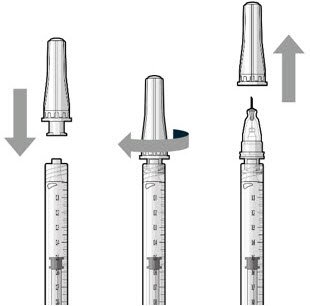 Figure 19 Figure 19 |
|
Step 8: Remove Any Remaining Air from Syringe and Adjust Drug Dose
|
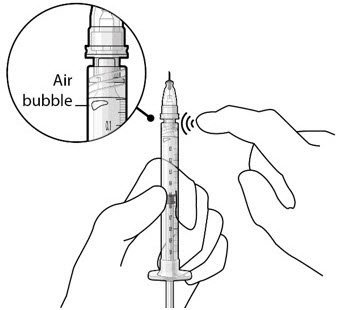 Figure 20  Figure 21 |
|
| Step 9: Inspect the Syringe for Air Bubbles | 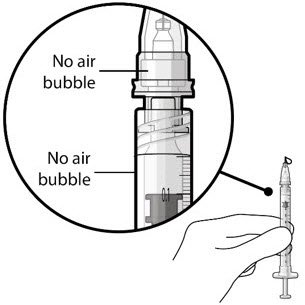 Figure 22 |
|
| Note: | Ensure no air bubbles are present in the syringe and needle hub. Air injected into the implant could result in slower drug release. | |
|
||
| Note: | Use the syringe within 15 minutes of removing all air and adjusting the drug dose to avoid drug solution drying in the needle and impeding fluid flow. Do not use the refill needle or syringe if the needle is clogged. |
|
| Step 10: Stabilize the globe and orient the refill needle | 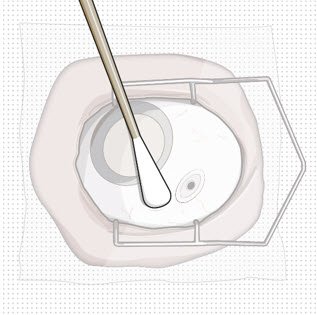 Figure 23 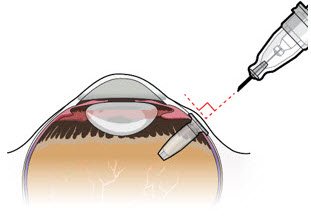 Figure 24 Figure 24 |
|
| Note: | Perform the refill-exchange procedure using magnification (e.g., loupes, reading glasses, magnifiers) for visual assistance. | |
|
||
| Step 11: Insert the Refill Needle | 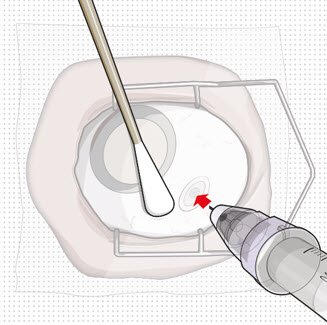 Figure 25 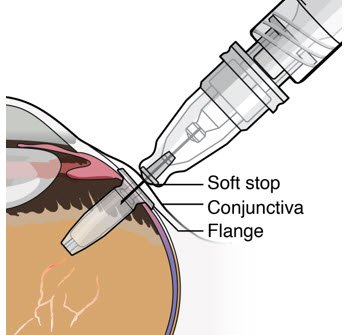 Figure 26 Figure 26 |
|
| Note: | Insert needle at the very center of the implant septum and perpendicular to the implant to ensure the needle inserts fully. Do not maneuver if there is resistance as it will bend the needle. Do not use a bent refill needle; replace if bent or if damage is suspected. |
|
|
||
Step 12: Refill the SUSVIMO Implant
|
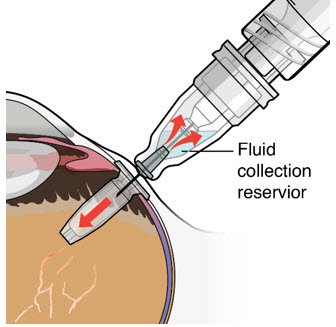 Figure 27 |
|
Step 13: Withdraw the Syringe
|
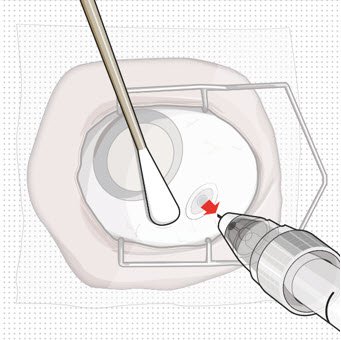 Figure 28 |
|
Step 14: Dispose of the Used Components
|
||
Step 15: Perform Indirect Ophthalmoscopy
|
||
Delayed or Missed Doses
If a planned dose (refill-exchange) of SUSVIMO (ranibizumab injection) is missed, it should be administered as soon as possible and the subsequent refill-exchange procedures should be performed 24 weeks (approximately 6 months) thereafter.
Dosage (Refill-Exchange) Modifications for Adverse Reactions
Table 1 describes dosage modifications for specific adverse Reactions [see Warnings and Precautions (5)]. No dosage reductions for SUSVIMO are recommended.
| Adverse Reactions | Dosage Modification |
|---|---|
| Intraocular inflammation ≥ 1 + cells or flare | Withhold dose (refill-exchange) |
| Sight threatening events (e.g., rhegmatogenous retinal detachment, vitreous hemorrhage, unexplained vision loss, etc.) | Withhold dose (refill-exchange) |
| Local infections of either eye | Withhold dose (refill-exchange) |
| Infectious endophthalmitis | Withhold dose (refill-exchange) |
| Severe systemic infection | Withhold dose (refill-exchange) |
| Observed damage to the implant | Withhold dose (refill-exchange) and consider SUSVIMO implant removal [see Dosage and Administration (2.6, 2.7)]. |
More about Susvimo (ranibizumab ophthalmic)
- Check interactions
- Compare alternatives
- Pricing & coupons
- Drug images
- Side effects
- During pregnancy
- FDA approval history
- Drug class: anti-angiogenic ophthalmic agents
- Breastfeeding
- En español
Patient resources
Other brands
Professional resources
Other brands
Related treatment guides
Further information
Always consult your healthcare provider to ensure the information displayed on this page applies to your personal circumstances.