Synovex C (Canada)
This page contains information on Synovex C for veterinary use.The information provided typically includes the following:
- Synovex C Indications
- Warnings and cautions for Synovex C
- Direction and dosage information for Synovex C
Synovex C
This treatment applies to the following species:CALF (STEERS AND HEIFERS) IMPLANTS
DIN 00618675
To improve growth rate in steer and heifer calves at least 45 days of age and weighing up to 185 kg.
Veterinary Use Only
For improved growth promotion in steer and heifer calves only.
Active Ingredients: Each implant (contents of one cartridge cell) contains:
100 mg Progesterone
10 mg Estradiol benzoate
SYNOVEX C implants contain two steroid hormones, progesterone and estradiol benzoate, to help speed up the calf’s weight gaining mechanism. SYNOVEX C is recommended for use in calves weighing up to approximately 185 kg.
Directions For Use
For subcutaneous ear implantation only. Implant complete contents of one cartridge cell (one implant) per calf. The proper implantation technique is fully described in the enclosed leaflet.
Storage
Store between 20 and 25°C with excursions between 15 and 30°C. Avoid freezing, sunlight, excessive heat and humidity.Instructions
Study the following instructions carefully, then proceed step by step, until the technique becomes routine. Many heads can be implanted per hour by an experienced team, one member of which should be assigned to do nothing but the implantation. Keep hands clean and use sanitary instruments only.
WarningsDo not use in calves to be processed for veal. Implant SYNOVEX in the ear only; any other location may result in condemnation of the carcass. Do not use the implanted ear for human or animal food. Keep out of reach of children. |
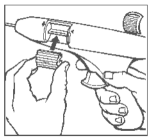
Step 1 Loading The Implanter
Load the implanter following the directions outlined in the instruction manual accompanying each implanter.
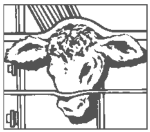
Step 2 Restraint
Calves must be adequately restrained prior to implantation to minimize movement of the head. Heavier calves may be confined to a restraint mechanism (squeeze chute or head gate). The implant site on the back of the ear should be prepared by scrubbing with a generous-sized piece of cotton that has been soaked in a germicidal solution.
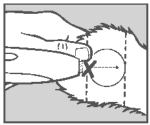
Step 3 Implant Site
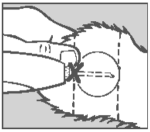
Divide the ear into three imaginary sections as illustrated. The implanted pellets should be deposited in the centre one-third of the ear as shown. To accomplish this, the implanter needle should be inserted in the outer one-third of the ear as indicated by the “X” in the illustration. Implanting too close to the head may cause side effects. Care should be taken to avoid severing the major arteries of the ear.
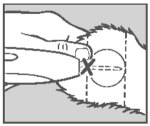
Step 4 Insert Needle
Grasp the ear with one hand. Holding the implanter firmly with the other hand, penetrate the skin at the point shown by the “X”. Thrust the needle under the skin taking care not to penetrate the cartilage. Ease the implanter forward (toward the base of the ear) until the full needle length is beneath the skin.
STEP 5 Pellet Implantation
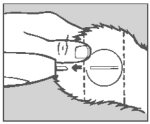
A) REVOLVER - When the needle is completely inserted, withdraw it approximately one-half inch. Then with continuous gentle pressure on the trigger, expel the pellets while continuing to slowly withdraw the needle. This technique allows the pellets to be deposited in a straight line in the path of the needle and helps avoid crushing or breaking the pellets that might otherwise occur if they were forced through the fibrous tissues under the skin. Crushing or breaking pellets may result in side effects.
B) SX10 GUN - When the needle is completely inserted activate the instrument by backward pressure on the trigger. Do not withdraw the needle, but allow the automatic needle retractor to release the pellets. This will allow the pellets to be deposited in a straight line in the path of the retracted needle.
Step 6 Inspection
Check the implant site. If properly administered, the implants should lie in a straight line under the skin.
Disinfect the implanter needle in a germicidal solution. You are now ready to implant the next animal.
Important
Proper cleansing of skin implantation area and the use of a clean implanter will prevent skin infection. When inserting needle, keep it just beneath the skin - do not allow needle point to injure the ear cartilage. If implantation is performed during the fly season, use a fly repellent on needle insertion area following pellet implantation.
Synovex C Cautions
Bulling, rectal and vaginal prolapse, ventral edema and elevated tailheads may occasionally be seen in calves implanted with SYNOVEX C.
Contraindications
SYNOVEX C implants should not be used in bull calves intended for reproduction. Heifer calves maintained for breeding purposes should not be reimplanted. Do not use in calves under 45 days of age or more than 185 Kg of body weight.
Zoetis is a trademark and Synovex is a registered trademark of Zoetis or its licensors, used under license by Zoetis Canada Inc.
Zoetis Canada Inc., Kirkland QC H9H 4M7
|
NET |
|
|
50 IMPLANTS |
2675-10-1 A6031F 30420701 |
|
100 IMPLANTS |
10014283-10-0 50255700 |
CPN: 1198408.3
16,740 TRANS-CANADA HIGHWAY, KIRKLAND, QC, H9H 4M7
| Order Desk: | 800-663-8888 | |
| Technical Services Canada: | 800-461-0917 | |
| Technical Services USA: | 800-366-5288 | |
| Website: | www.zoetis.ca |
 |
THIS SERVICE AND DATA ARE PROVIDED "AS IS". Animalytix assumes no liability, and each user assumes full risk, responsibility, and liability, related to its use of the Animalytix service and data. See the Terms of Use for further details. |
Copyright © 2024 Animalytix LLC. Updated: 2024-02-27